Back to FS2004 SDK Overview

Microsoft
Flight Simulator 2004:
A Century of Flight
Software Development Kit
© 2003 Microsoft Corporation. All rights reserved.
Discreet and gmax are trademarks of Discreet Logic Inc./Autodesk, Inc., in the U.S.A.
and/or other countries.
gmax Attach Tool SDK
November 2003

Contents
gmax Attach Tool SDK.......................................................................................................1
November 2003...................................................................................................................1
Contents..............................................................................................................................2
Introduction........................................................................................................................3
Using Scripts in gmax.........................................................................................................4
Using the Attach Tool in gmax..........................................................................................5
Attaching an Effect.............................................................................................................7
Attaching an Object..........................................................................................................11
Removing Crash Boxes....................................................................................................13
Creating a platform..........................................................................................................17
Empty attach points..........................................................................................................19

Introduction
Microsoft
®
Flight Simulator 2004 includes gmax, a 3D modeling tool from discreet. The
Attach Tool included in this SDK is a MAXScript plugin that works in gmax and allows
you to attach effects and other gmax objects to your 3D model. It also allows you to
create landable platforms, remove crash boxes from parts of your model and attach
beacons or other sim driven objects to your model.
This SDK references EffectHouse.gmax. This is a file that is included in the gmax
gamepack in the Scenes folder.
If you are a beginning gmax user, you should look at the gmaxscenerytutorial.doc in the
Gmax_Scenery SDK before continuing with this SDK. That will cover a lot of the basic
gmax concepts that are used in this SDK.
This Attach Tool will work in 3D Studio Max as well. It has been tested in 3D Studio
Max 5.0 but will probably work in some earlier versions as well.
Using Scripts in gmax
In order to use the Attach Tool provided, copy AttachToolGmax.ms to your
scripts directory within your gmax root directory. (For example: C:\gmax\scripts).
The script does not have to be located in this directory. A Max Script will work
from any directory. However, gmax defaults to this directory when you run a
script, so this makes it a little easier to find and use.
To run a script from gmax, do the following:
1. Start gmax and then click on the Utilities tab within gmax.
2. Click on the MAXScript button in the Utilities rollout. This will open the
MAXScript rollout.
3. On the MAXScript rollout, click on the Run Script button. This will open the
Choose Editor File dialog. Navigate to the script you wish to run, in this case,
AttachToolGmax.ms.
4. Double click on AttachToolGmax.ms. This will evaluate (run) this script.
Using the Attach Tool in gmax
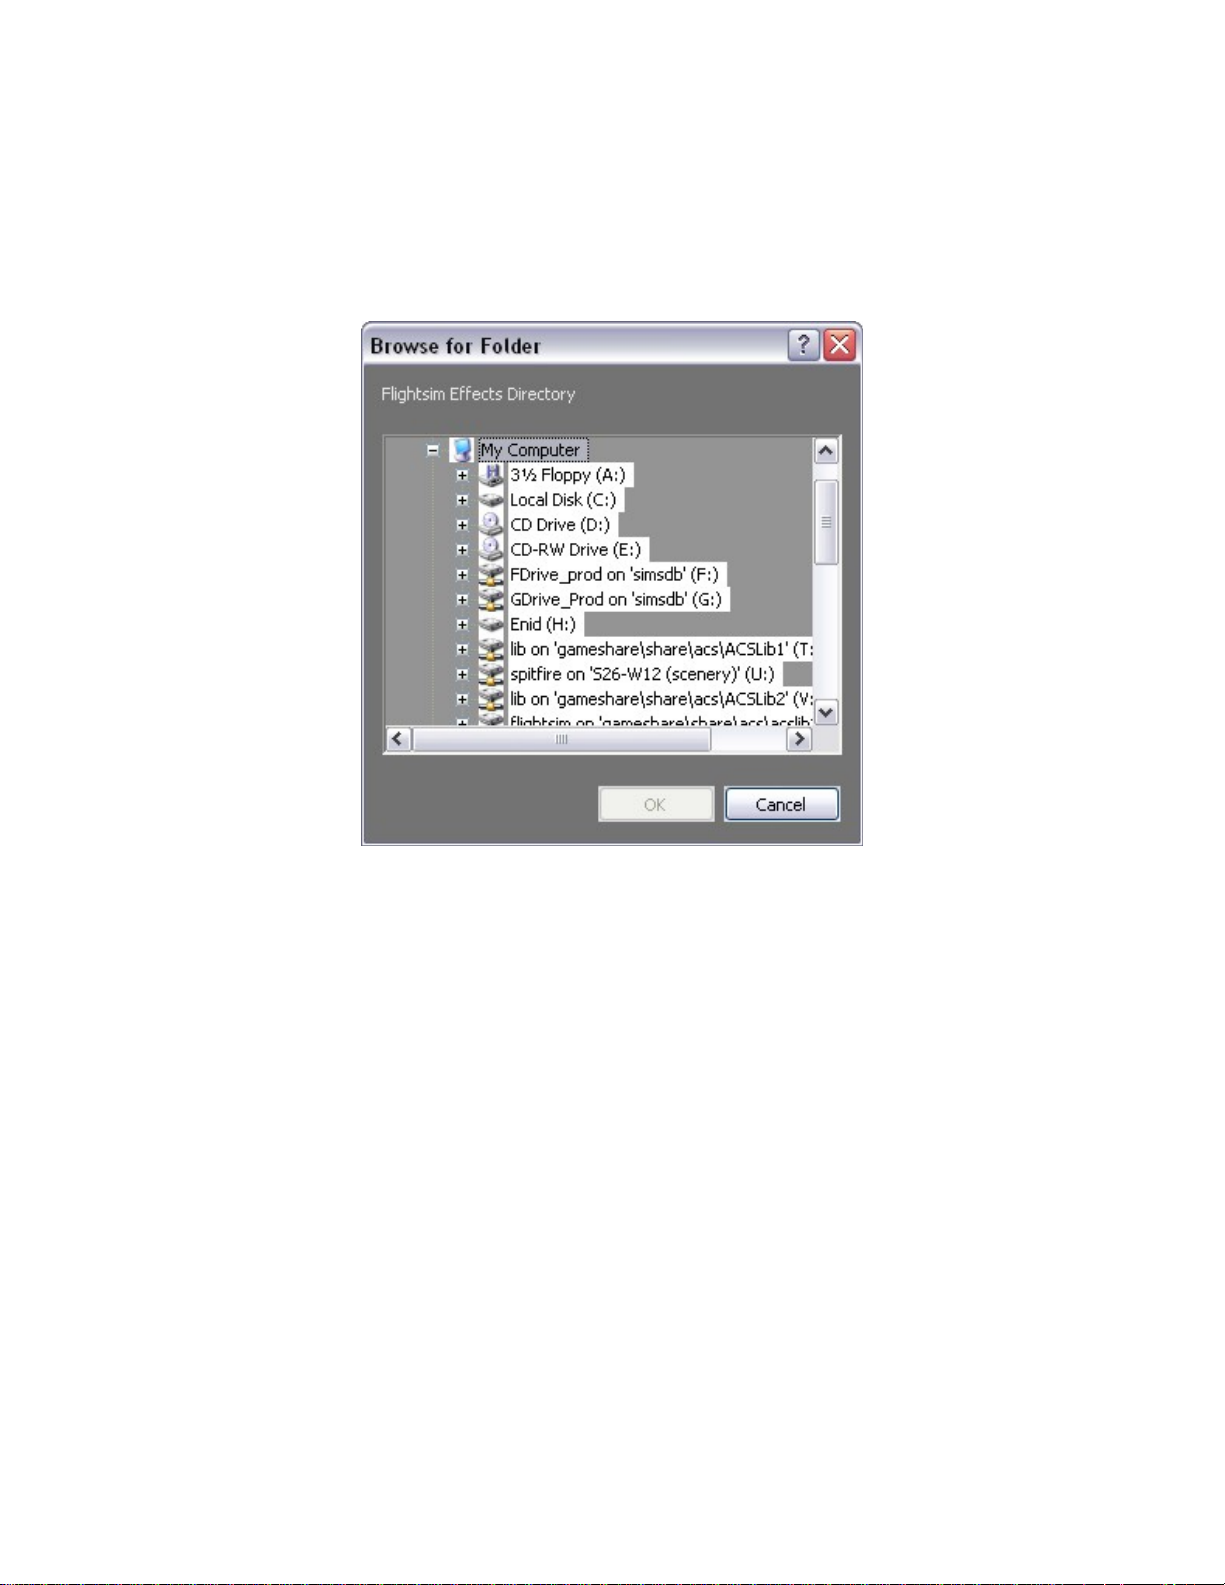
When you first evaluate the AttachToolGmax.ms script in gmax using the Run Script
button on the MAXScript rollout, it will open the Browse for Folder dialog with a
subheading of Flightsim Effects Directory.
This is prompting you to navigate to your effects directory in your Flightsim folder on
your hard drive. The reason it is doing this is so that it can parse what effects you have
on your hard drive that it might be able to attach to an object. Any effect in the effects
directory will show up on the list of possible effects that can be attached. This way all of
your custom effects can be attached to an object. If your effects directory is located at
C:\Program Files\Microsoft Games\Flight Simulator 9\Effects\, you can press the
Cancel button because this is the directory it will default to when you press cancel. (This
saves a little time navigating to the directory every time you use the tool.) If you do not
successfully navigate to the Flightsim effects directory, nothing will show up in the list of
effects to attach. More on this in the Attaching an Effect section.
Once you have evaluated the script, it should pop up a dialog that looks like this:
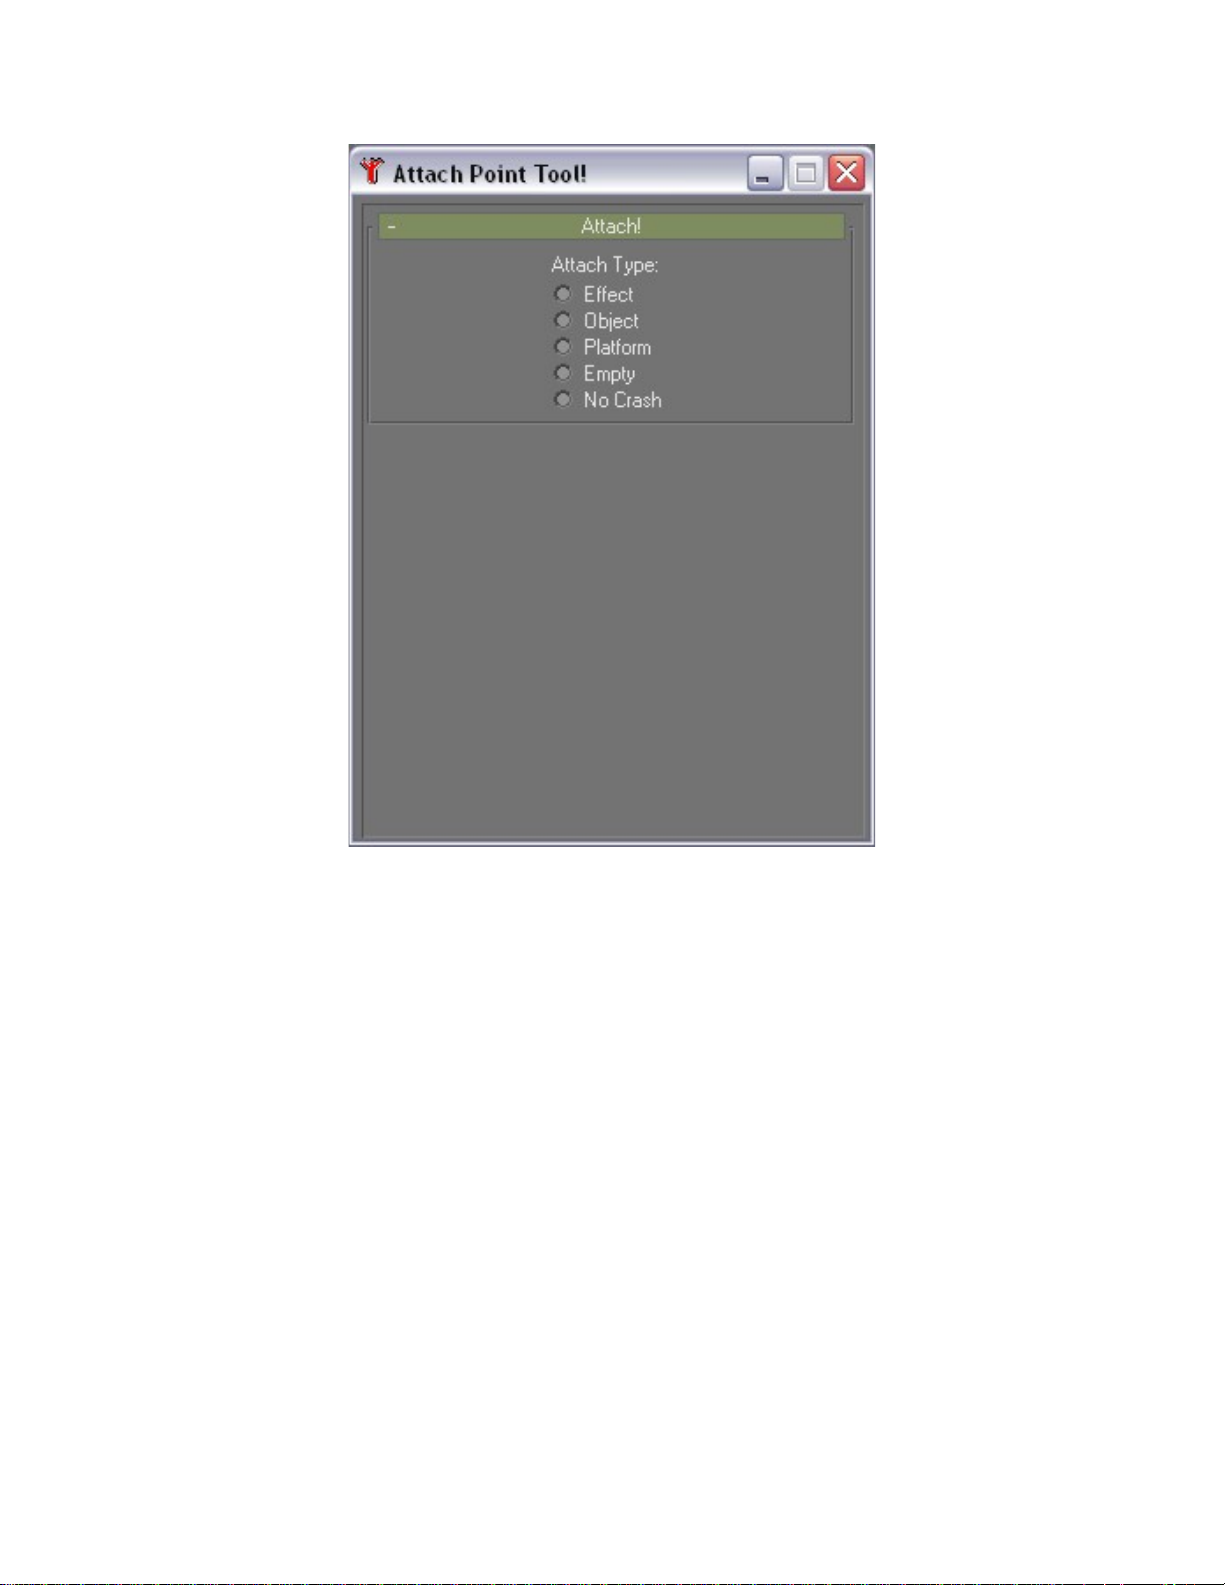
In the Attach rollout is a radio button for each Attach Type. Each of the radio buttons
allows you to do something different. The Effect radio button allows you to attach an
effect to your object. The Object radio button allows you to attach another 3d gmax
object. The Platform radio button allows you to create a landable platform with
attributed surface characteristics. The Empty radio button allows you to attach a custom
simulation object such as a beacon. (This is for advanced users/developers only, as all of
the code required to hook up the object you want to attach must be written by you or
someone you know). The No Crash radio button allows you to remove crash boxes from
a portion of your model.

Attaching an Effect
In order to attach an effect to your model, you must define a point in space where you
want that effect to display in relation to your model. This is done by creating a box or
another piece of geometry and using its pivot point as the location for the effect. All of
the information such as what type of effect or special parameters are then stored in the
user defined properties of that box as an xml stream. When the model passes through
MakeMDL in order to be processed into a format that Flight Simulator can read, the
geometry for the box is removed and what is left is a point where the effect will be
attached. Here’s how to view the xml stream that defines the effect and its properties:
1. Before we do anything in gmax, we need to get the effects in the right place.
Copy the included fx_ChimneySmoke.fx and fx_VentSteam.fx files to your
effects directory in your Flightsim folder (C:\Program Files\Microsoft
Games\Flight Simulator 9\Effects).
2. Open the included EffectHouse.gmax file. I have added a chimney and a vent to
this version of the house that are not in the House.gmax file used in the
gmaxSceneryTutorial.doc. The chimney already has an effect attached to it.
You can see the bright green box that sits just above the chimney.
3. Select that box and then right-click over it in any viewport. This will bring up the
Quad Menu. Select Properties… in the Quad Menu. This will bring up the
Object Properties dialog. In the Object Properties dialog, click on the User
Defined tab. In the text box, there should be something that looks like this:
<?xml version="1.0" encoding="ISO-8859-1" ?> <FSMakeMdlData
version="9.0"><Attachpoint name="attachpt_ChimneySmoke">
<AttachedObject> <Effect effectName="fx_ChimneySmoke"
effectParams=""/> </AttachedObject> </Attachpoint></FSMakeMdlData>
This is the xml stream that tells Flight Simulator what to do with this geometry.
In this case, it is attaching the effect fx_ChimneySmoke.fx to the pivot location of
the object attachpt_ChimneySmoke. You can enter this xml by hand into the
User Defined Properties of any object, or you can use the Attach Tool to do this
for you.
Here’s how to use the Attach Tool to attach an effect:
1. First you need to create a location for the effect to go. Do this by creating a box
over the opening of the grey vent on the backside roof of the house in
EffectHouse.gmax. If you do this in the top window, the pivot point will be at
the bottom of the box. Center the pivot over the opening of the vent in the top
viewport.
2. In one of the other viewports, move the box so that the pivot is just above the top
of the vent. The effect will be spawned at that location and will appear to be
emitting from the vent.
3. If you have not already evaluated the Attach Tool script, do that now (see the
Using the Attach Tool in gmax section above.) The Attach Point Tool dialog
should now be open.
4. Click on the Effect radio button.
5. Select the box above the vent. Make sure it is the only thing selected.
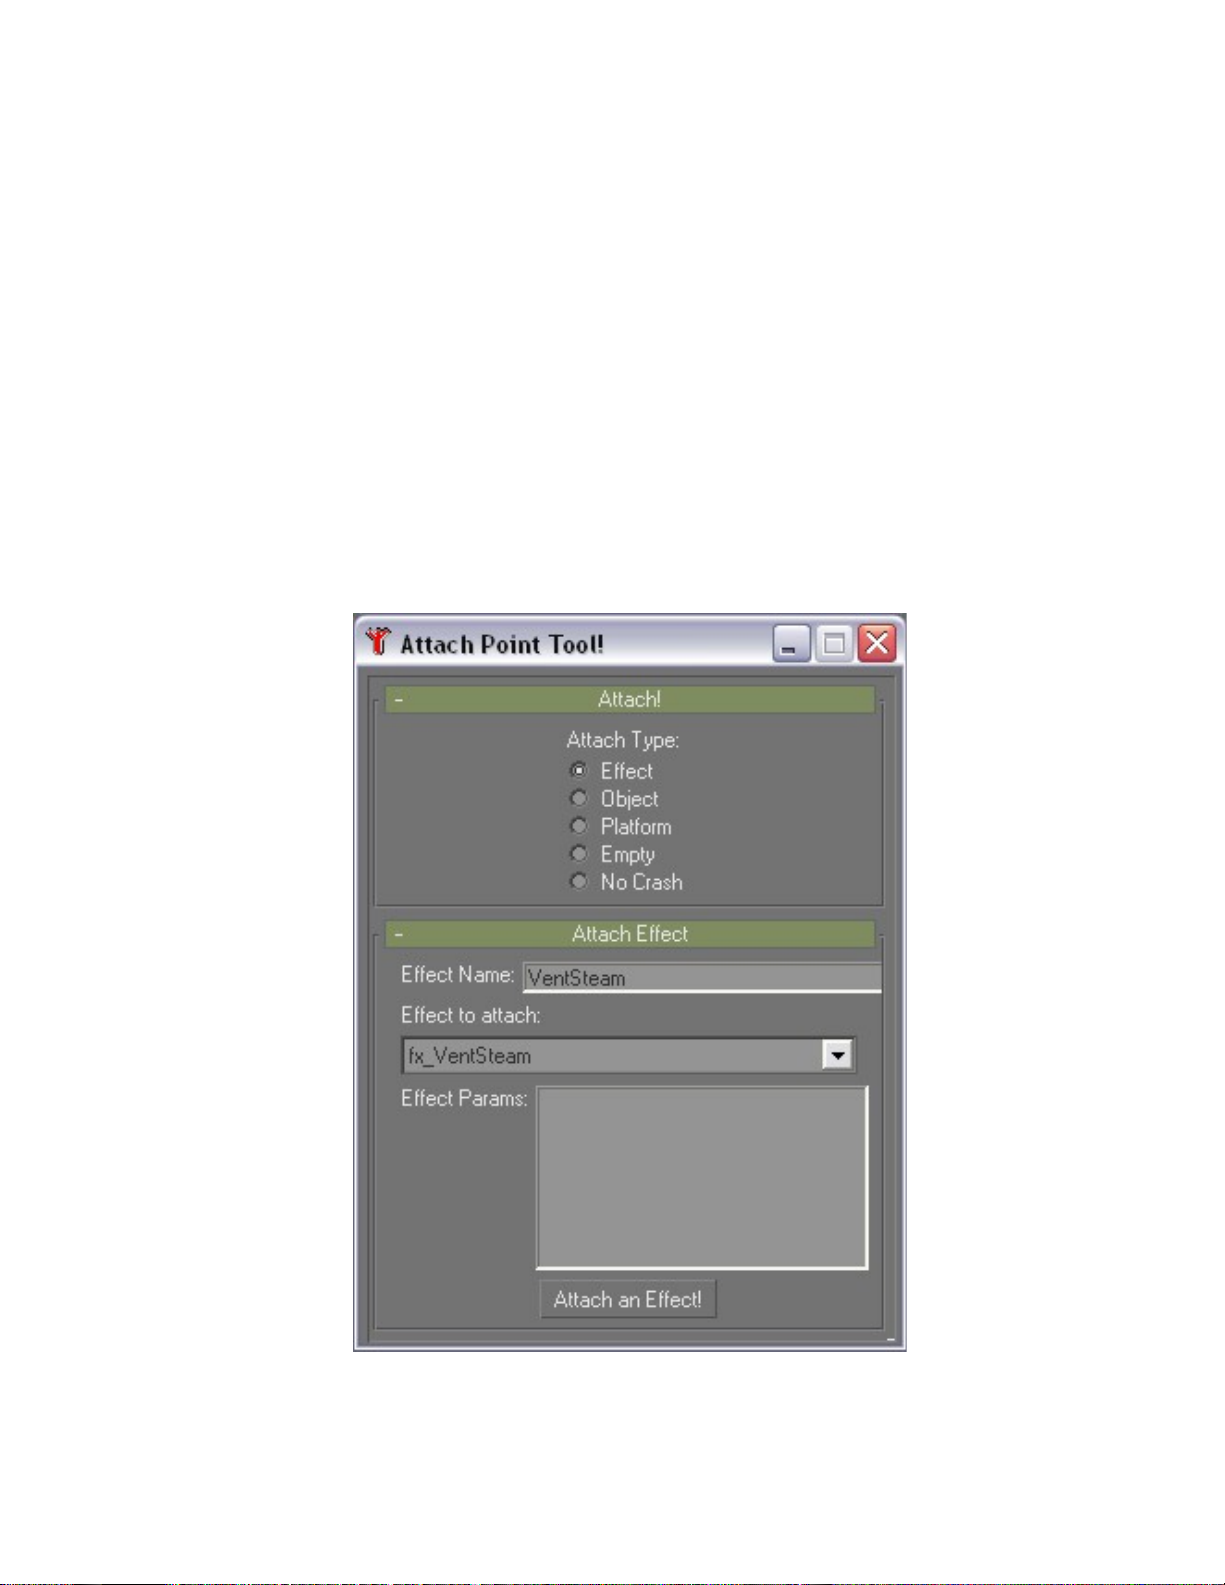
6. Choose a name for the effect and type it into the Effect Name edit text box.
(Note: If you have more than one effect in your scene, make sure they all get a
unique name, otherwise Flightsim will only place one effect at one of your
locations.) I’m going to call it “VentSteam”.
7. In the Effect to attach drop down list, select the effect you want to attach at this
location. In this case, I’ve chosen fx_VentSteam from the list. (Note: If you
don’t have anything in your Effect to attach drop down list except “None,” this
means you didn’t successfully navigate to your Flightsim effects directory when
you first ran the script. If this is the case, close the Attach Point Tool dialog and
rerun the MAXScript making sure to carefully navigate to your Flightsim effects
directory.) Your Attach Point Tool dialog should now look like this:

8. If you want to have the effect only show up during certain times, you can use the
Effect Params edit text box to add some parameters to the effects. Here are the
parameters and what they mean:
DAY=1 (Effect only displays during the day)
NIGHT=1 (Effect only displays during the night)
DUSK=1 (Effect only displays during the dusk)
DAWN=1 (Effect only displays during the dawn)
Time based parameters:
YEAR=2002,2003 (The year during which you want the effect to display. In this
case, it will display during the years 2002 and 2003.)
MOY=01,03 (The months of the year during which you want the effect to display.
In this case, it will display from January to March.)
DOM=01, 18 (The days of month during which you want the effect to display. In
this case, it will display from the 1
st
until the 18
th
.)
HOD=00, 22 (The hours of the day during which you want the effect to display.
In this case, it will display from midnight until 10 pm.)
MOH=00,20 (The minutes of the hour during which you want the effect to
display. In this case, it will display from minute 0 until minute 20.)
SOM=23,48 (The seconds of the minute during which you want the effect to
display. In this case, it will display from second 23 until second 48.)
DURATION=20 (The duration the effect should last in seconds, if the effect
emitter has an infinite lifetime. If the effect has a limited time span, and emits
over and over, use the minutes or seconds to control the beginning and end of the
effect.)
So if you want to string a bunch together, use “;” to separate the parameters. Here
are a few examples:
Kilauea Eruption:
YEAR=1983,1983;MOY=01,01;DOM=03,03;HOD=07,07;MOH=29,29;DURAT
ION=31536000
It occurs on January 3, 1983 at 7:29 am and lasts 352 days.
Atlanta Fireworks:
MOY=07,07;DOM=04,04;HOD=22,22;MOH=00,20;
On July 4
th
every year, at 10:00pm it starts and lasts until 10:20 pm.
New York New Years Eve Fireworks:
MOY=01,01;DOM=01,01;HOD=00,00;MOH=00,20;
It starts every year on January 1
st
at Midnight and lasts until 12:20 pm.
9. Make sure your box is still selected and then press the Attach an Effect button.
Nothing will appear to have happened. However, behind the scenes, the box will
have been renamed to “attachpt_VentSteam” and the user properties will look
like this:
<?xml version="1.0" encoding="ISO-8859-1" ?> <FSMakeMdlData
version="9.0"><Attachpoint name="attachpt_VentSteam">
<AttachedObject> <Effect effectName="fx_VentSteam"
effectParams=""/> </AttachedObject> </Attachpoint></FSMakeMdlData>
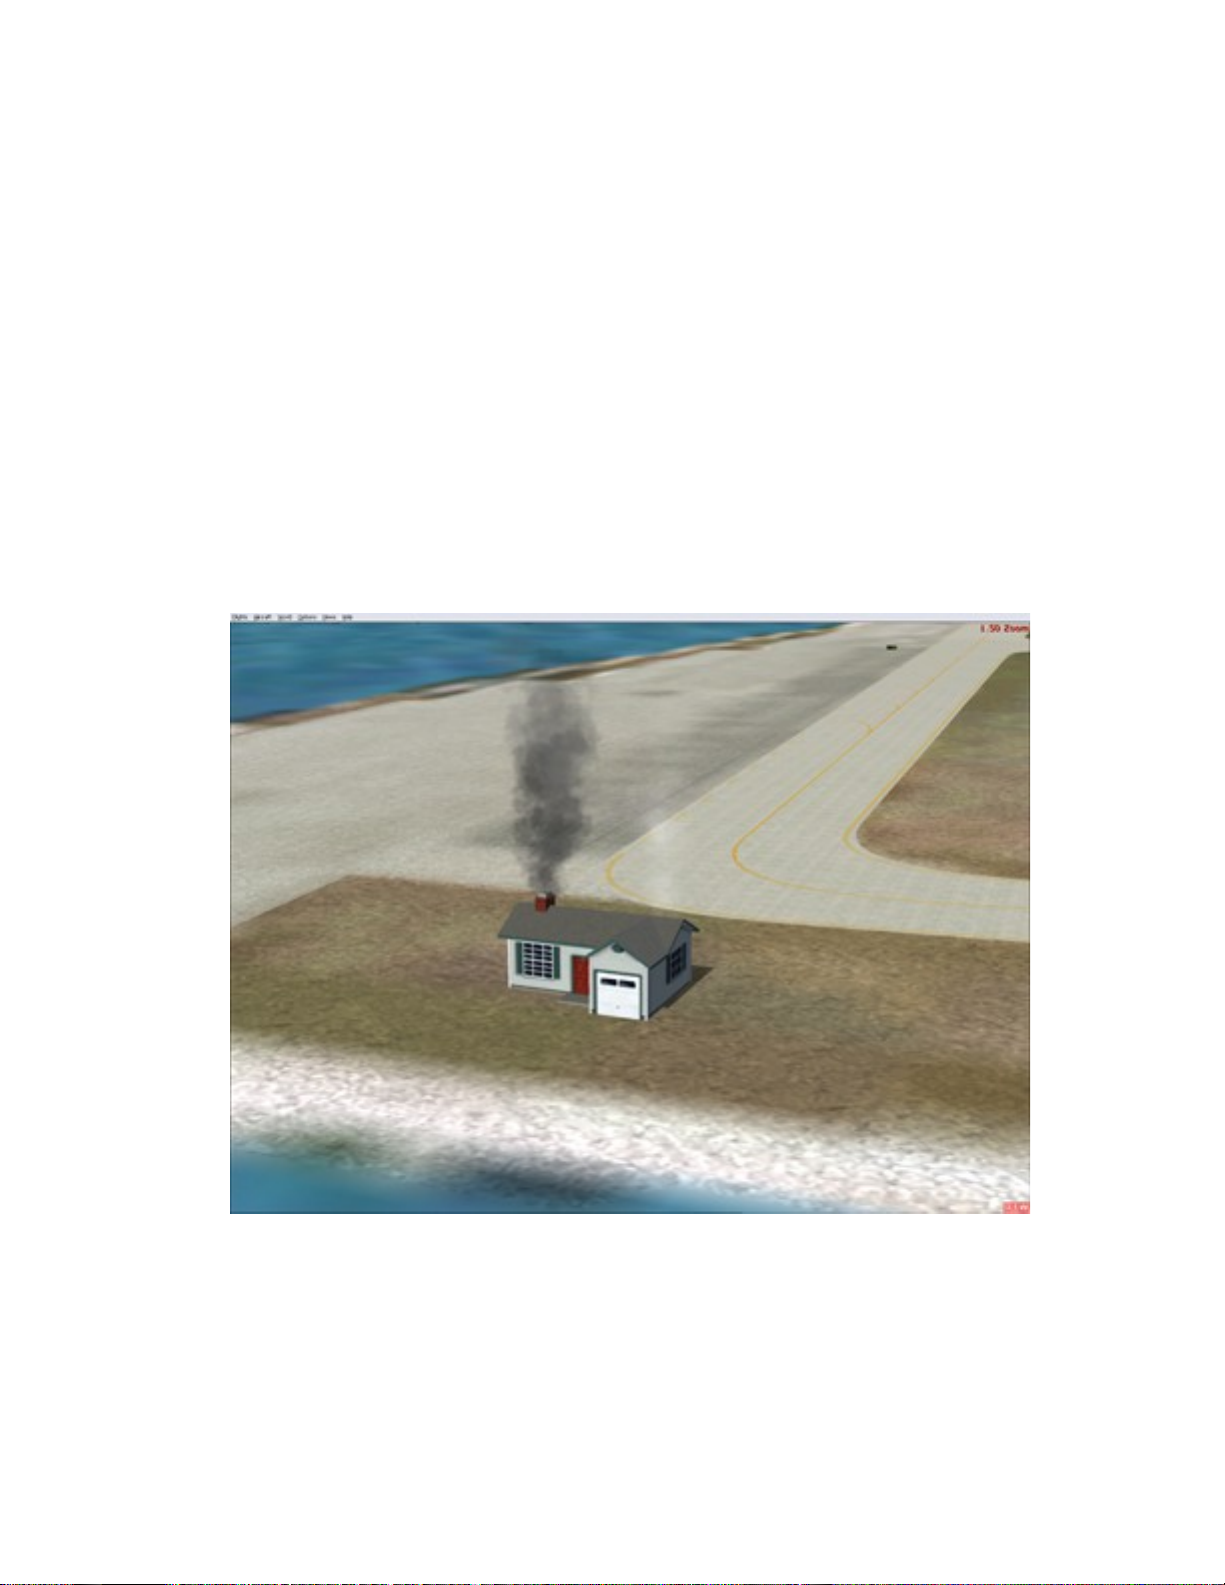
10. You should now be able to export your model and see the effect in Flight
Simulator. If you do not know how to get your model into Flightsim, see the
gmaxscenerytutorial.doc. Here’s what mine looks like:

Attaching an Object
Attaching an object is very similar to attaching an effect. In fact, the only difference is
that you’ll need a GUID instead of an effect name. Otherwise, you use the exact same
process. Create a box, use the tool to give it some User Defined Properties and you
should see an object at that location in Flight Simulator when you load it up. Here’s a
simple step by step guide for attaching a light post to the front lawn of the house:
1. Open the included EffectHouse.gmax file.
2. Create a box where you want the object to appear. The pivot point of the box will
be where the pivot point of the top node (dummy node that everything is linked to
in your LOD structure) will be placed.
3. Run the AttachToolGmax.ms script.
4. Click on the Object radio button.
5. Enter a name for the object in the Object Name edit text box, in this case,
“LightPost”.
6. Enter the GUID for the object in the Custom GUID edit text box. The GUID for
an object can be found in the xml file that gets exported from gmax. Here is the
xml file for EffectHouse.gmax when exported (with the comments removed):
<?xml version="1.0" encoding="ISO-8859-1"?>
<FSData version="9.0" xmlns:xsi='http://www.w3.org/2001/XMLSchema-
instance' xsi:noNamespaceSchemaLocation="bglcomp.xsd">
<SceneryObject lat="47 25.79" lon="-122 18.43" alt="0" pitch="0"
bank="0" heading="0" altitudeIsAgl="TRUE" imageComplexity="NORMAL">
<LibraryObject name="94E0B90B4D34BEFA9B69BDB95B6D7304"
scale="1.0" />
</SceneryObject>
<ModelData name="94E0B90B4D34BEFA9B69BDB95B6D7304"
sourceFile="EffectHouse.mdl" />
</FSData>
Within that xml code is name=”4DF308F9479021B27015258AFA290E79,"
which is the GUID you want to enter into the Custom GUID edit text box.
7. The GUIDs for objects that shipped with Flightsim are located in the BGLComp
SDK in a file called “LibraryObjects.xls”. The GUID for the Light Post that I
want to attach is:
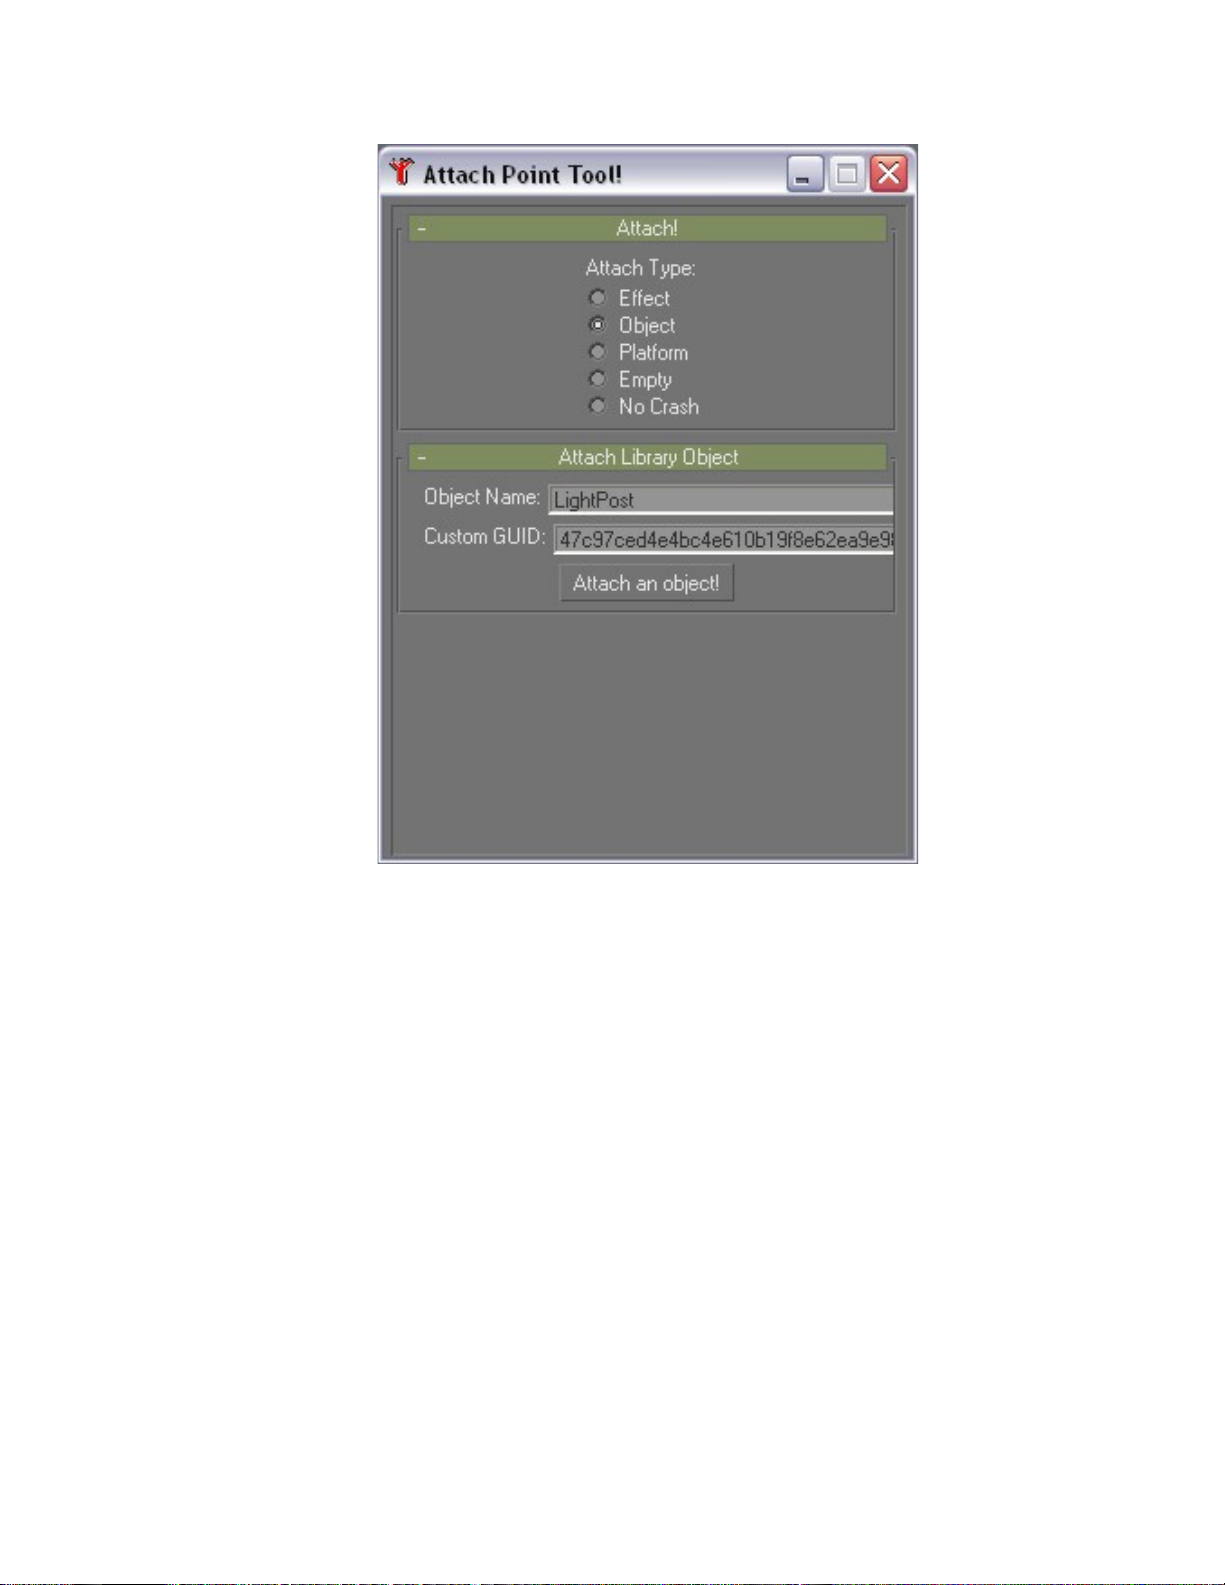
47c97ced4e4bc4e610b19f8e62ea9e98
So here is what my Attach Tool dialog looks like:
8. Select the box that you created earlier.
9. Click Attach an Object on the Attach Tool dialog. This will change the name of
the box to “attachpt_LightPost” and put the following xml stream into the User
Defined Properties of the box:
<?xml version="1.0" encoding="ISO-8859-1" ?> <FSMakeMdlData
version="9.0"><Attachpoint name="attachpt_LightPost">
<AttachedObject> <LibraryObject
name="47c97ced4e4bc4e610b19f8e62ea9e98" scale="1.0"/>
</AttachedObject> </Attachpoint></FSMakeMdlData>
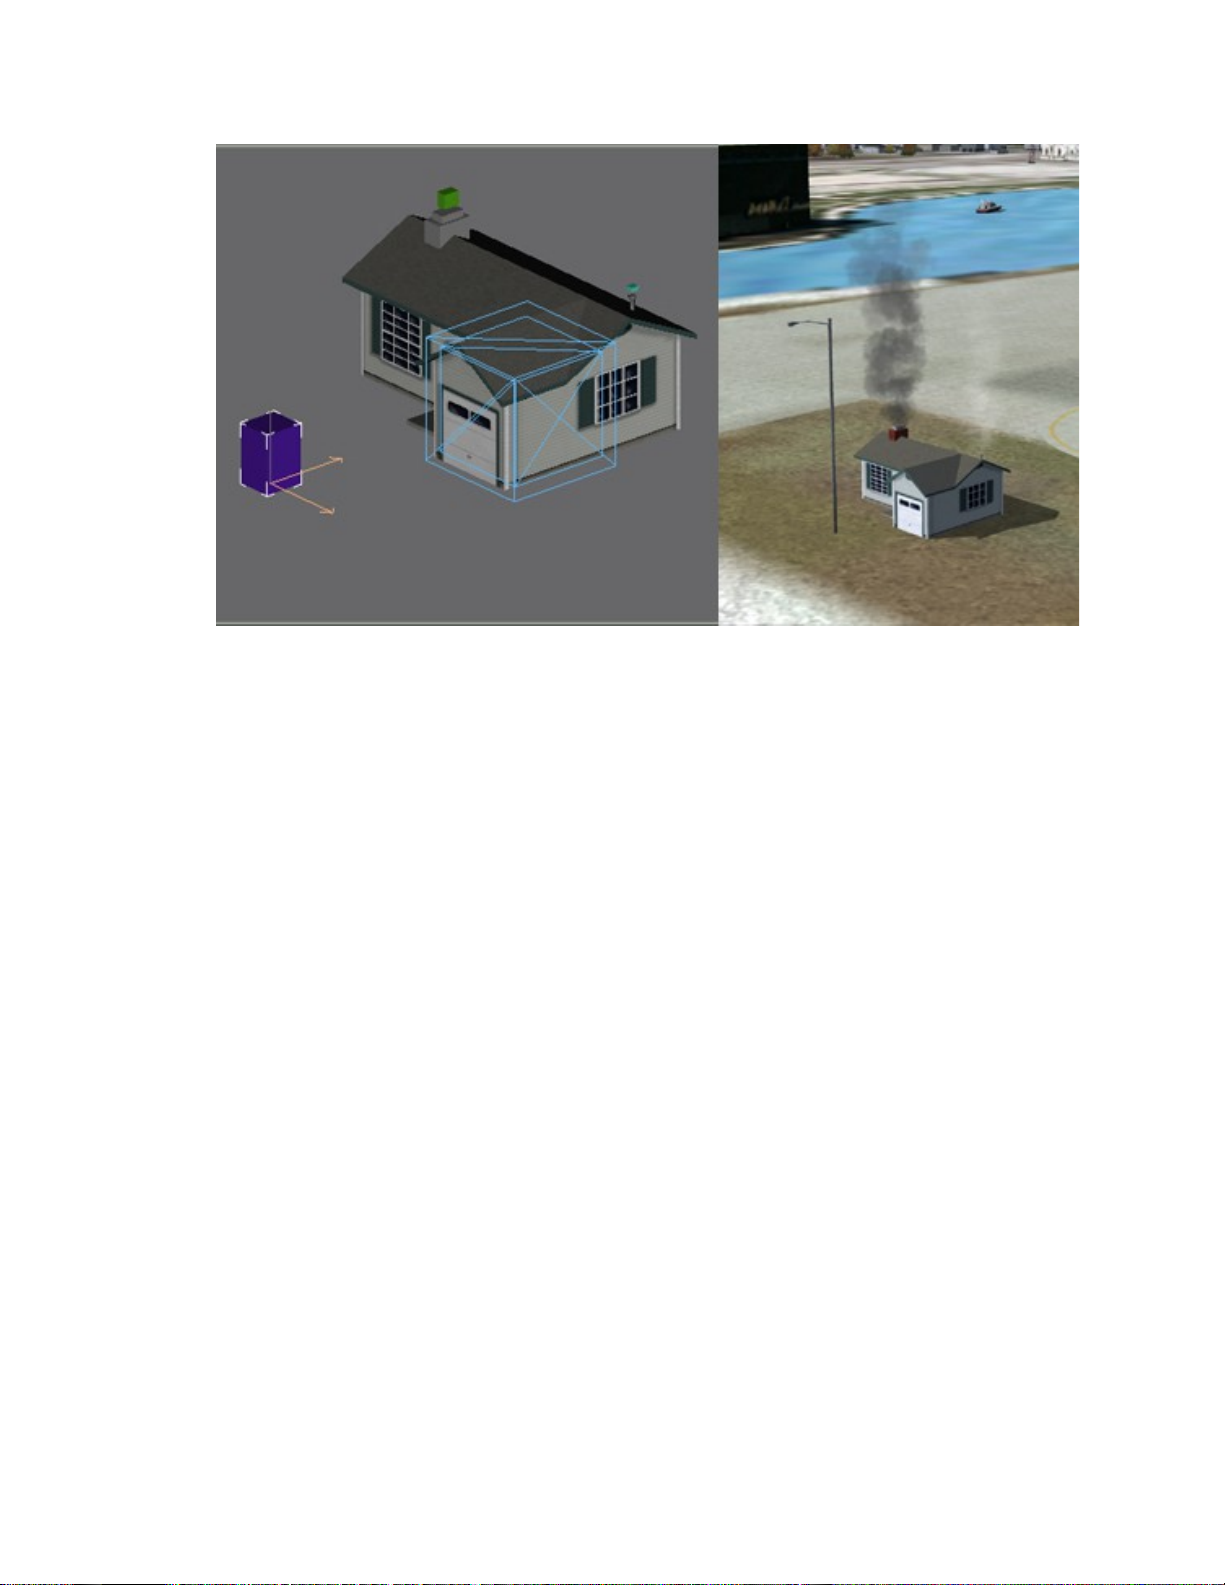
Here’s what it looks like in gmax and Flight Simulator side by side:
Removing Crash Boxes
Removing crash boxes from geometry allows you to create portions of your model that
the aircraft will not crash into. This is especially handy when working with platforms
(see below). Here is how to remove crash boxes from your geometry:
1. First separate the geometry that you don’t want to have crash boxes from the
rest of your model. In this case, remove crash boxes from the garage of the
house so that you can park your plane in the garage.
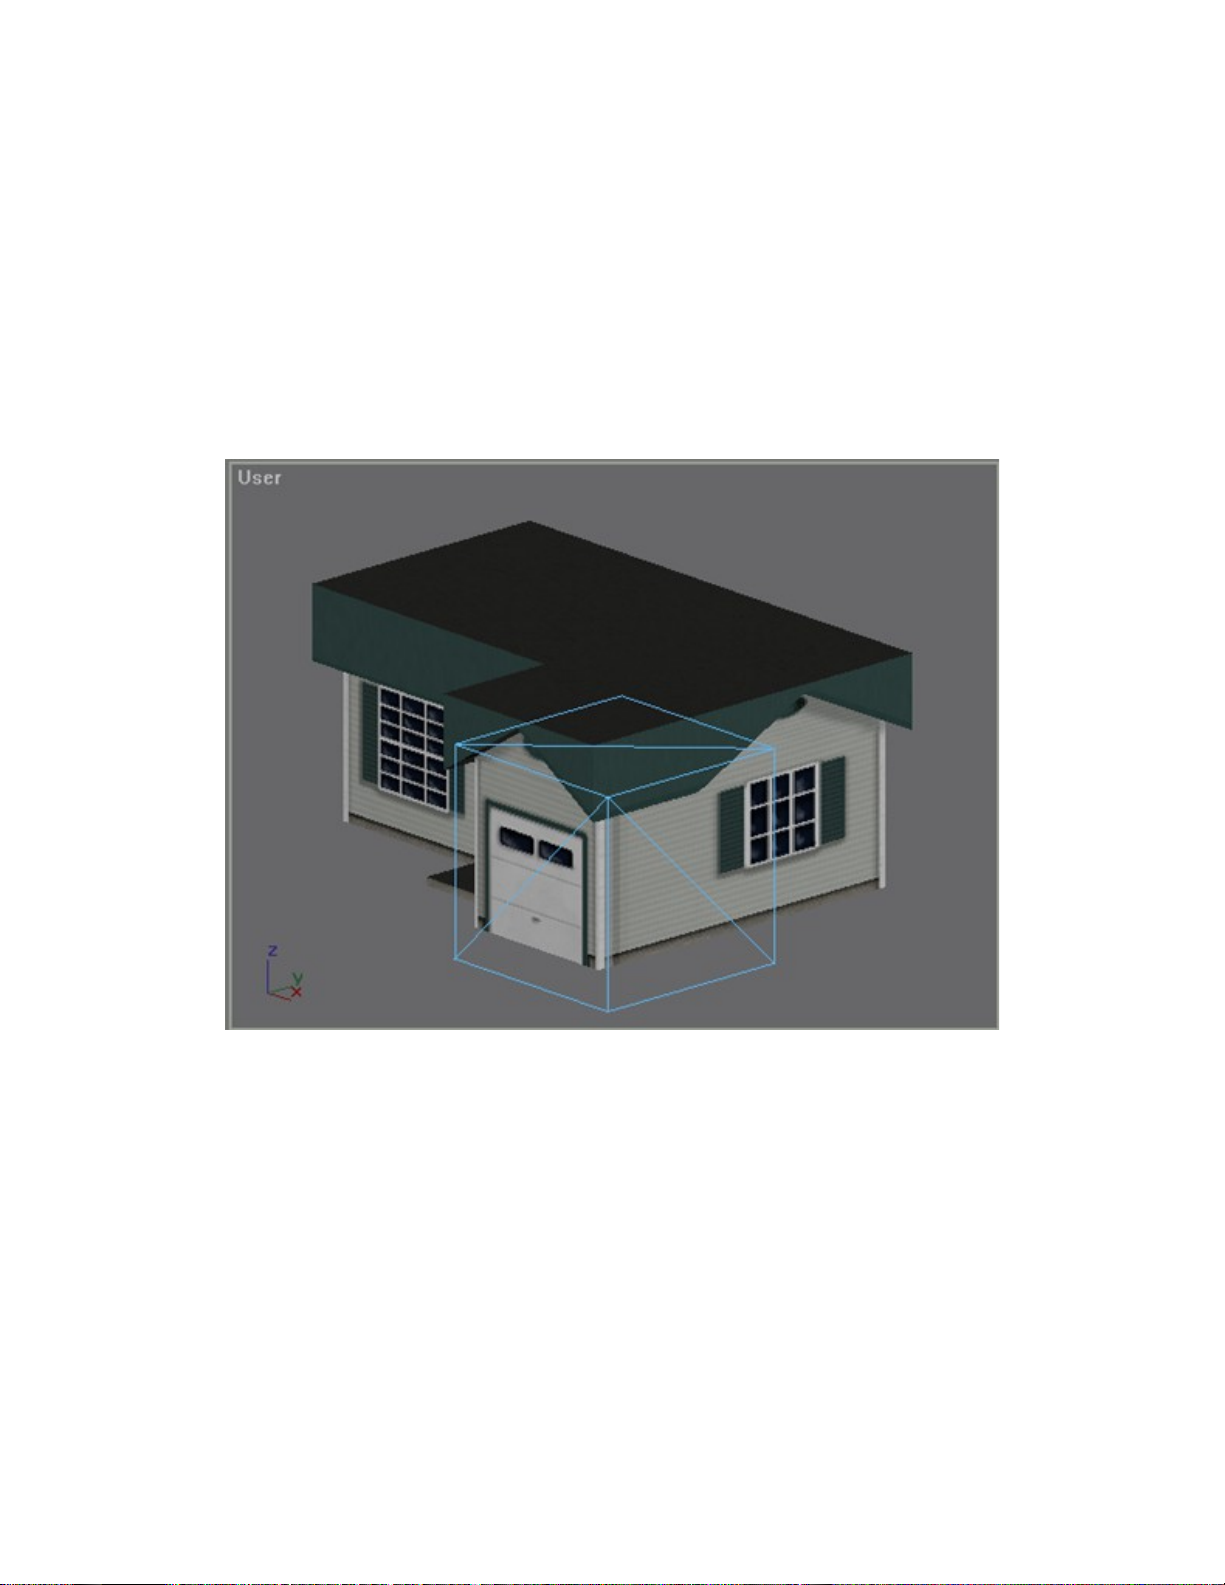
2. Select all of the faces of the garage like this:
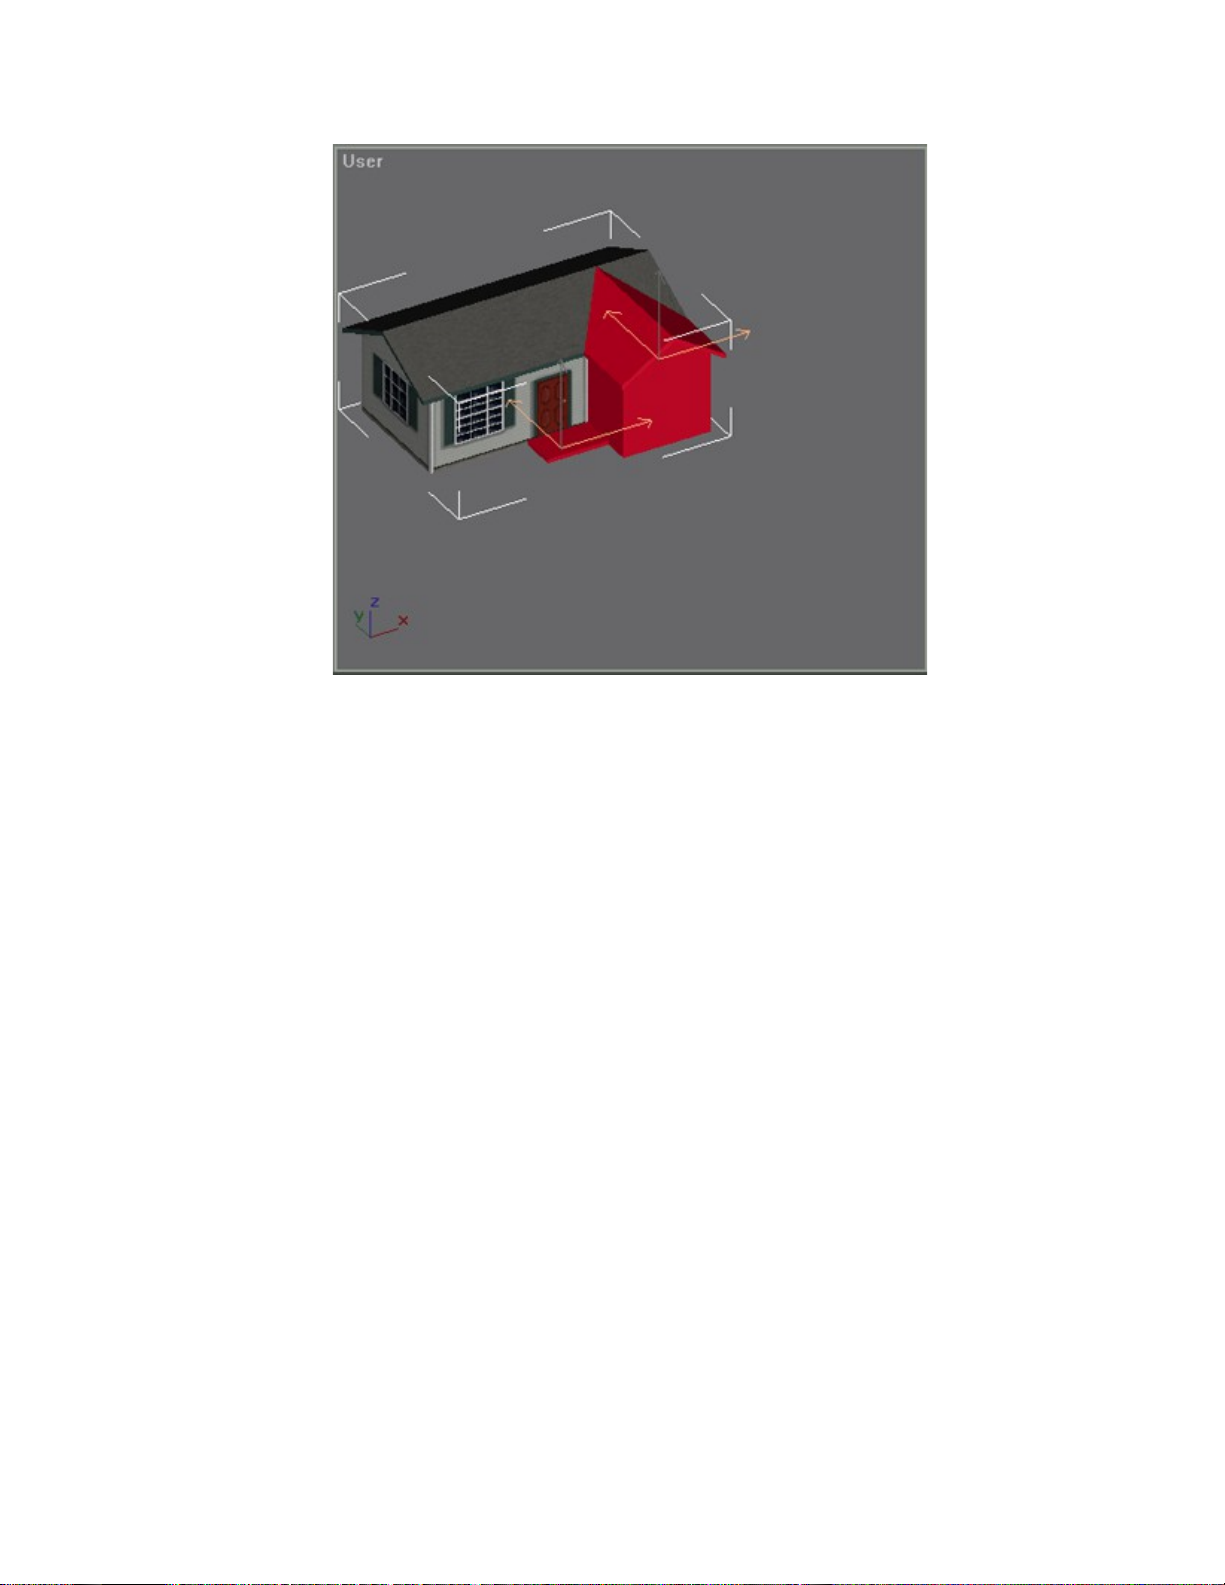
3. Then in the Modify tab in the Edit Geometry rollout, click the Detach
button.
4. This will bring up the Detach dialog. In the Detach as edit text box, give the
new object a name, like “Garage”.
5. Link the new Garage object to the 100 LOD dummy node
(EffectHouse_LOD_100).
6. Select the Garage object.
7. Run the AttachToolGmax.ms script.
8. Click on the No Crash radio button. The Attach Tool dialog should now
look like this:
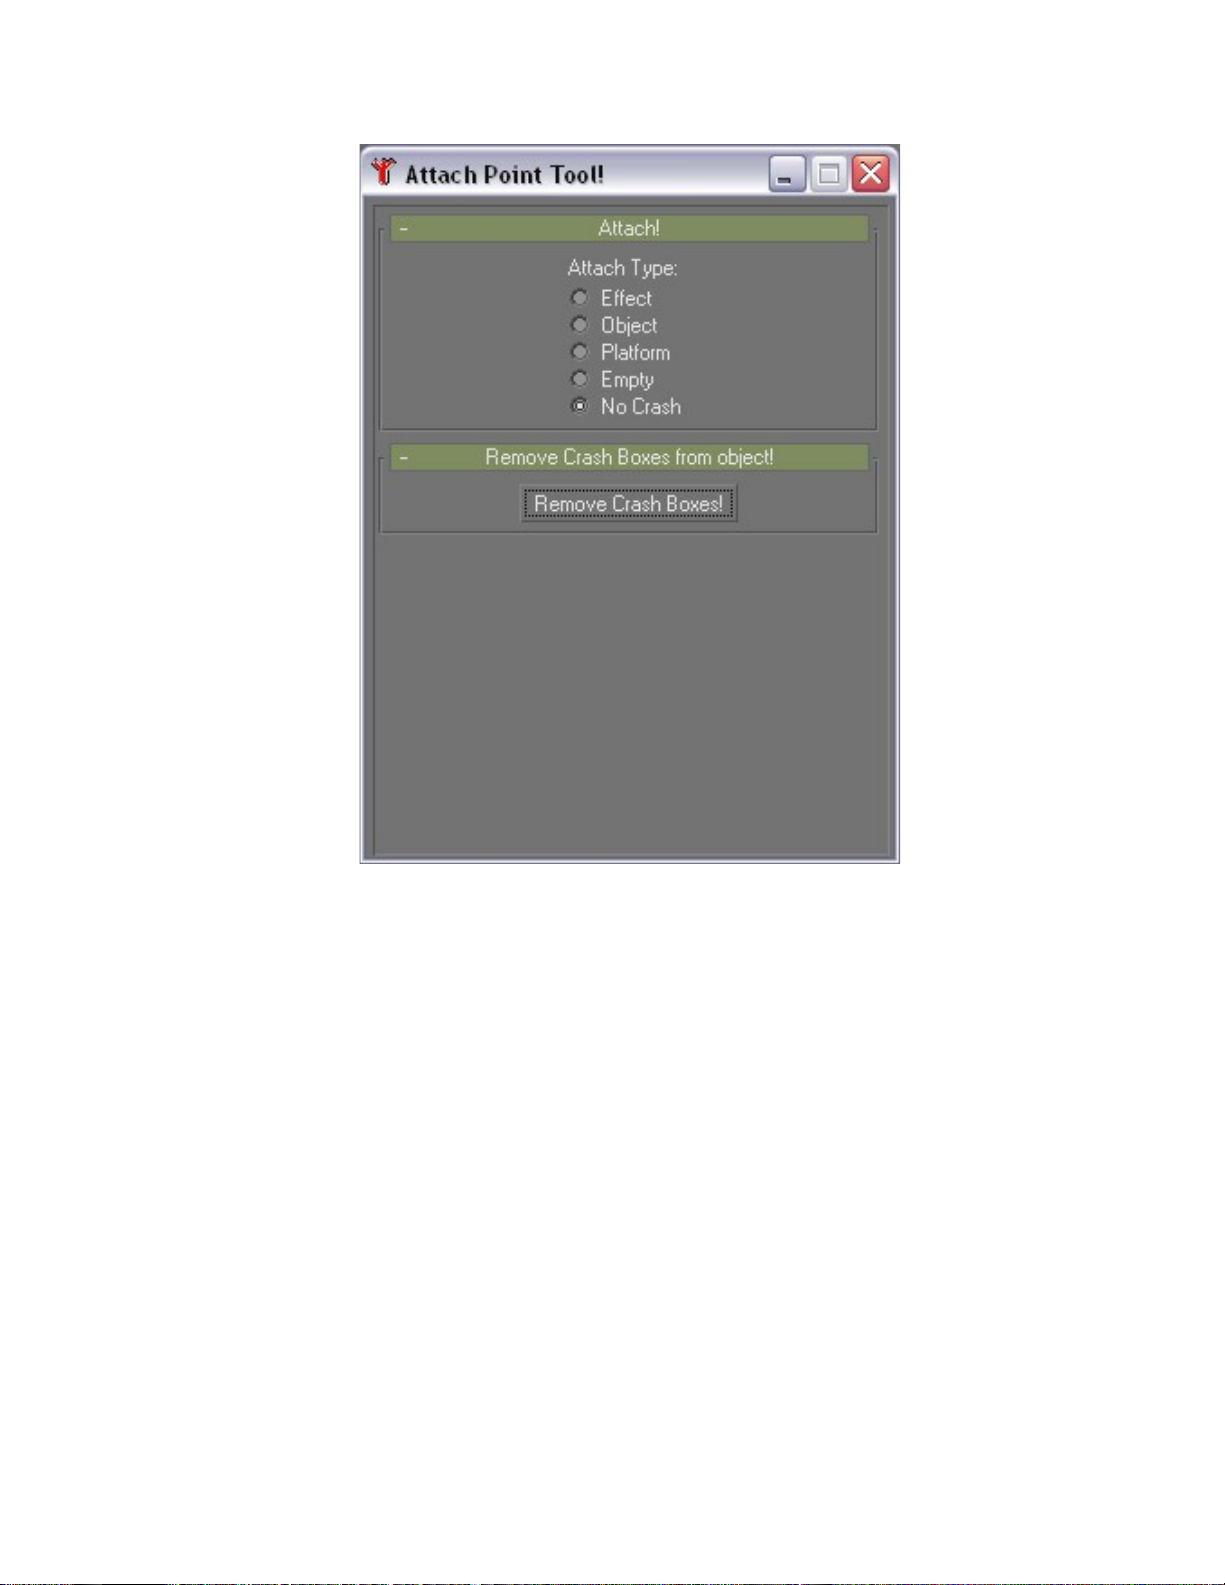
9. Click on the Remove Crash Boxes! button. This will put the following xml
in the User Defined Properties of the garage:
<?xml version="1.0" encoding="ISO-8859-1" ?> <FSMakeMdlData
version="9.0"><NoCrash/></FSMakeMdlData>
10. Follow steps 2-9 for each of the LODs. This has to be done because any
geometry in any LOD will generate crash boxes for the object. This means
you have to create a dummy for each EffectHouse_LOD_[number] and link
the garage and the rest of the house to that dummy for each LOD.
11. And this is what the crash boxes will look like in Flight Simulator:
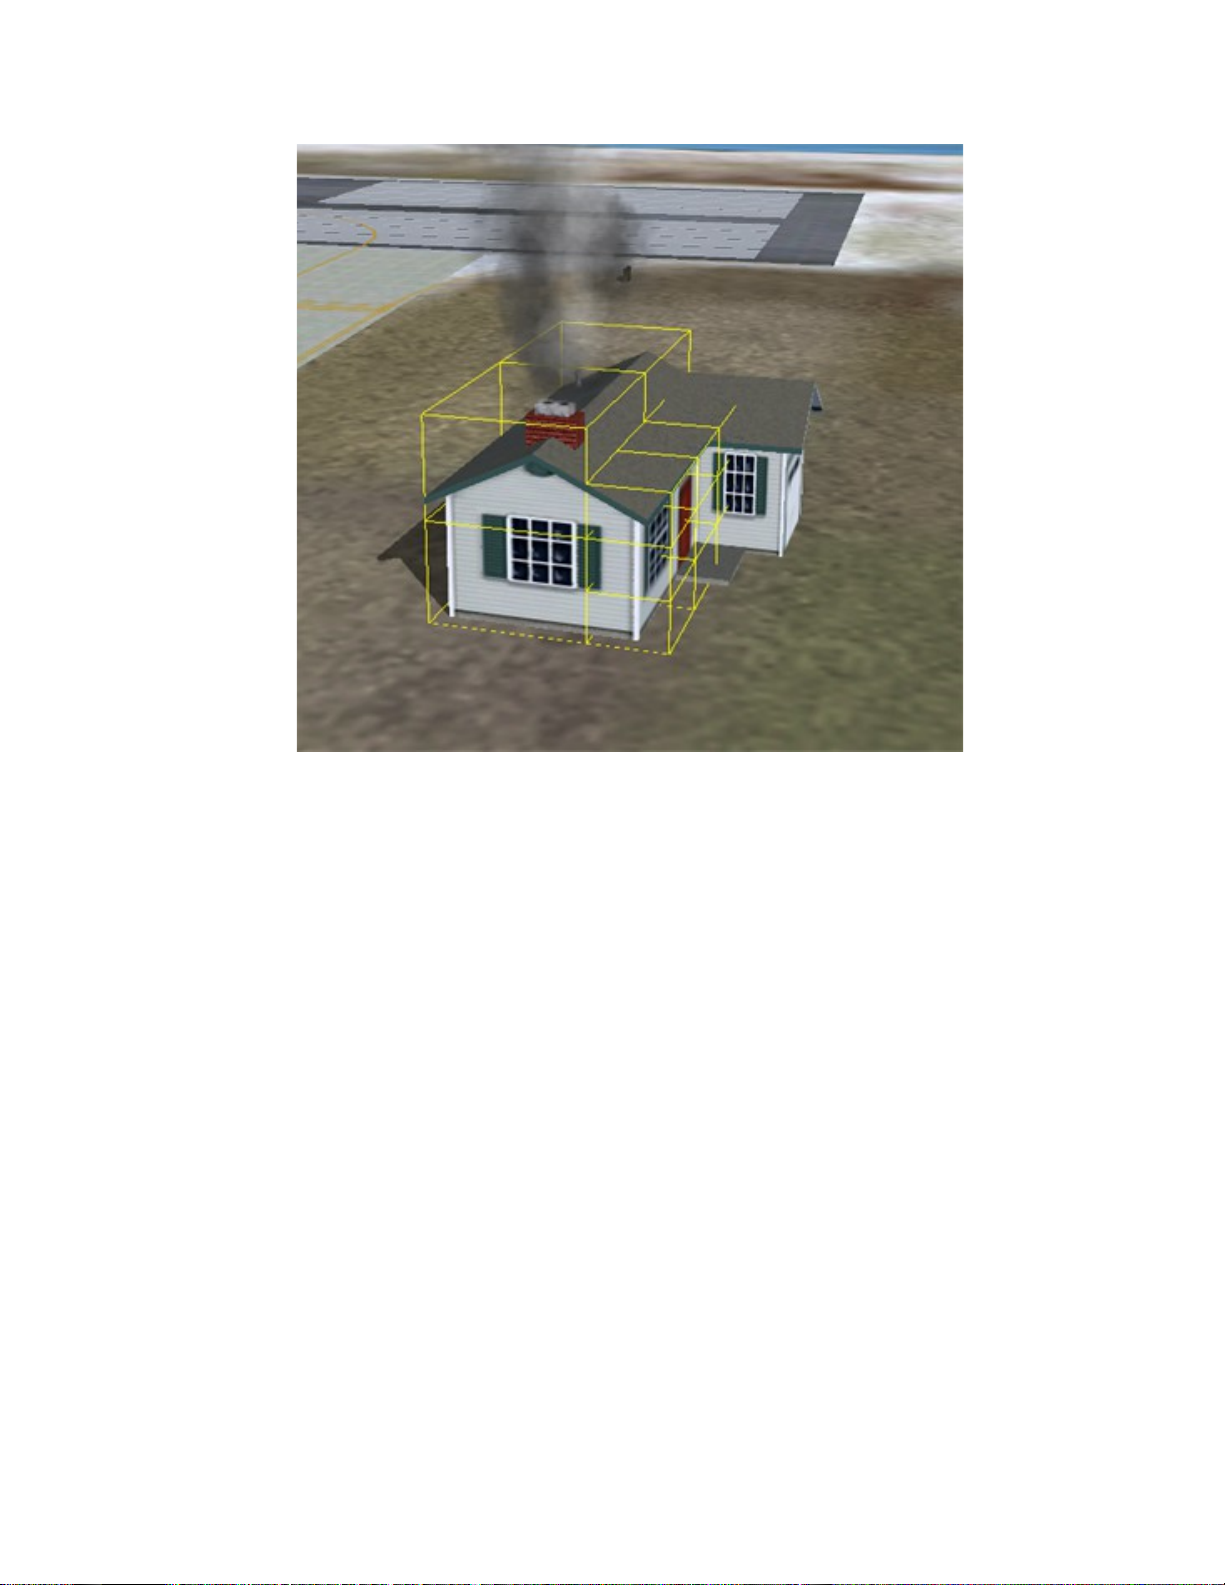
Notice that the front of the garage is now sticking out in front of the yellow crash
boxes as opposed to being enclosed in it. This means you can fly through that
portion of the garage and not crash.
Creating a platform
In order to create a platform in gmax, you must create new platform geometry and
remove the crash boxes from nearby geometry so that you can land on the platform
without crashing. To do this, try making the roof of the house a landable platform:
1. Open the EffectHouse.gmax file.
2. Select and delete the chimney and the vent and the attach point boxes for the
smoke and steam.
3. On all the LODs, manipulate the roof so that it is a flat landing surface, like this:
4. Next, on one of the LODs, select the polygons that make up the flat roof surface.
Go into Select and Move mode. Hold down the Shift key and click on one of the
move axes. This should bring up the Clone Part of Mesh dialog.
5. In the Clone Part of Mesh dialog, select the Clone to Object radio button and
name the object something like “RoofPlatform”.
6. Link the RoofPlatform object to the root node of your scene (the dummy named
the same as the filename that all of the LODs are linked to).
7. Run the AttachToolGmax.ms script. Click on the Platform radio button.
8. In the Platform Name edit text box, type in a name like “HouseRoof”.
9. The Surface Type Drop Down List allows you to select all of the available
surface types for this platform. This will determine how the aircraft interacts with
this platform (for example what effects are triggered or how rough the surface is).
Try different types to see different reactions in Flight Simulator.
10. Select the RoofPlatform object and then press the Create a Platform button on
the Attach Tool dialog. This will put the following xml stream into the User
Defined Properties:
<?xml version="1.0" encoding="ISO-8859-1" ?> <FSMakeMdlData
version="9.0"><Platform name="platform_HouseRoof"
surfaceType="ASPHALT" /> <NoCrash/> </FSMakeMdlData>
11. Notice that it gives both a platform name and a NOCRASH tag. This is so that it
won’t generate crash boxes for this geometry so that you can actually land on it.
12. Following the steps in the Removing Crash Boxes section above, remove the
crash boxes from all of the roof areas for all of the LODs. This means selecting
all of the roof polygons (be sure to include the eaves because the crash boxes tend
to generate a little larger than the actual object), detaching them and using the
Attach Tool to remove the crash boxes.
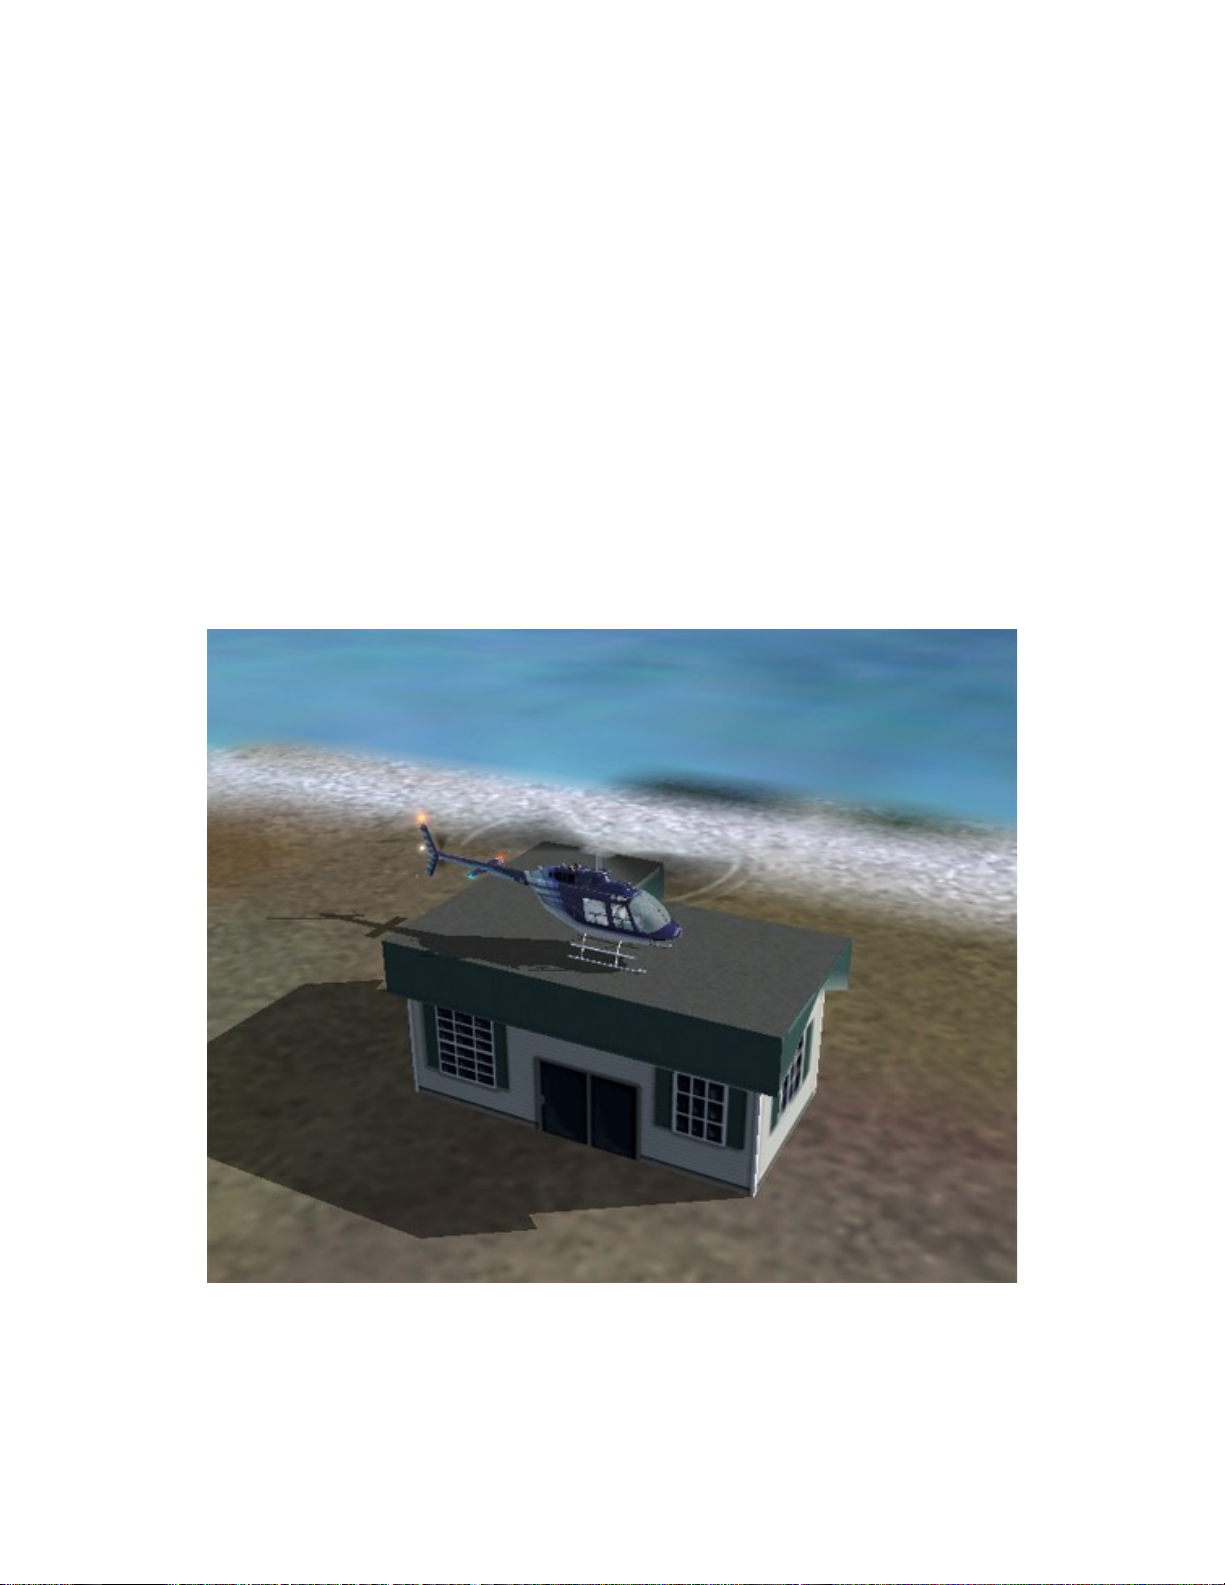
13. Here is what the house now looks like with a helicopter resting on top of it:

Empty attach points
Empty attach points are used to attach objects that require input from the sim engine.
Beacons are a perfect example of this. They need to do more than just exist. They need
to have certain logic based on the type of beacon, visibility or time of day. The empty
attach type is used to call out the location of the beacon on the model, and then the xml
placement determines the type of beacon and finally the sim engine tells the beacon what
to do based on visibility or time of day. Here’s how to attach a beacon to the house:
1. Open the included AnimEffectGmax.gmax file.
2. Create a box on the roof of the house where you want the beacon to appear.
3. Run the AttachToolGmax.ms script. In the Attach Tool dialog, select the
Empty radio button.
4. Select the box where you want the beacon to appear.
5. In the Name of Empty edit text box, type “beacon”.
6. Press the Attach an Empty button on the Attach Tool dialog.
7. Export the model from gmax. The xml file that is created will look like this (the
GUID will be different in your file):
<?xml version="1.0" encoding="ISO-8859-1"?>
<FSData version="9.0"
xmlns:xsi='http://www.w3.org/2001/XMLSchema-instance'
xsi:noNamespaceSchemaLocation="bglcomp.xsd">
<!-- Sample object placement. Remove comment markers to
place object east of 34R at Sea Tac. -->
<!--
<SceneryObject lat="47 25.89" lon="-122 18.43" alt="0"
pitch="0" bank="0" heading="0" altitudeIsAgl="TRUE"
imageComplexity="NORMAL">
<LibraryObject
name="11ABC10148253A2ED9B6FABE43E92FFB" scale="1.0" />
</SceneryObject>
-->
<!-- Inclusion of model data. Use the 'Name' of this
object to place -->
<!-- it in other locations.
-->
<ModelData name="11ABC10148253A2ED9B6FABE43E92FFB"
sourceFile="EffectHouse.mdl" />
</FSData>
8. Change the xml to look like this:
<?xml version="1.0" encoding="ISO-8859-1"?>
<FSData version="9.0"
xmlns:xsi='http://www.w3.org/2001/XMLSchema-instance'
xsi:noNamespaceSchemaLocation="bglcomp.xsd">
<SceneryObject lat="47 25.89" lon="-122 18.43" alt="0" pitch="0"
bank="0" heading="0" altitudeIsAgl="TRUE"
imageComplexity="NORMAL">
<LibraryObject name="11ABC10148253A2ED9B6FABE43E92FFB"
scale="1.0" />
<AttachedObject attachpointName="attachpt_beacon" >
<Beacon type="CIVILIAN" baseType="AIRPORT" />
</AttachedObject>
</SceneryObject>
<ModelData name="11ABC10148253A2ED9B6FABE43E92FFB"
sourceFile="EffectHouse.mdl" />
</FSData>
In the Beacon tag in the above xml, there is a type= and a baseType=.
The type= can be “CIVILIAN” or “MILITARY”.
The baseType=can be “AIRPORT”, “HELIPORT” or “SEA_BASE”.
The combination of these different types will cause the appropriate beacon to
show up.
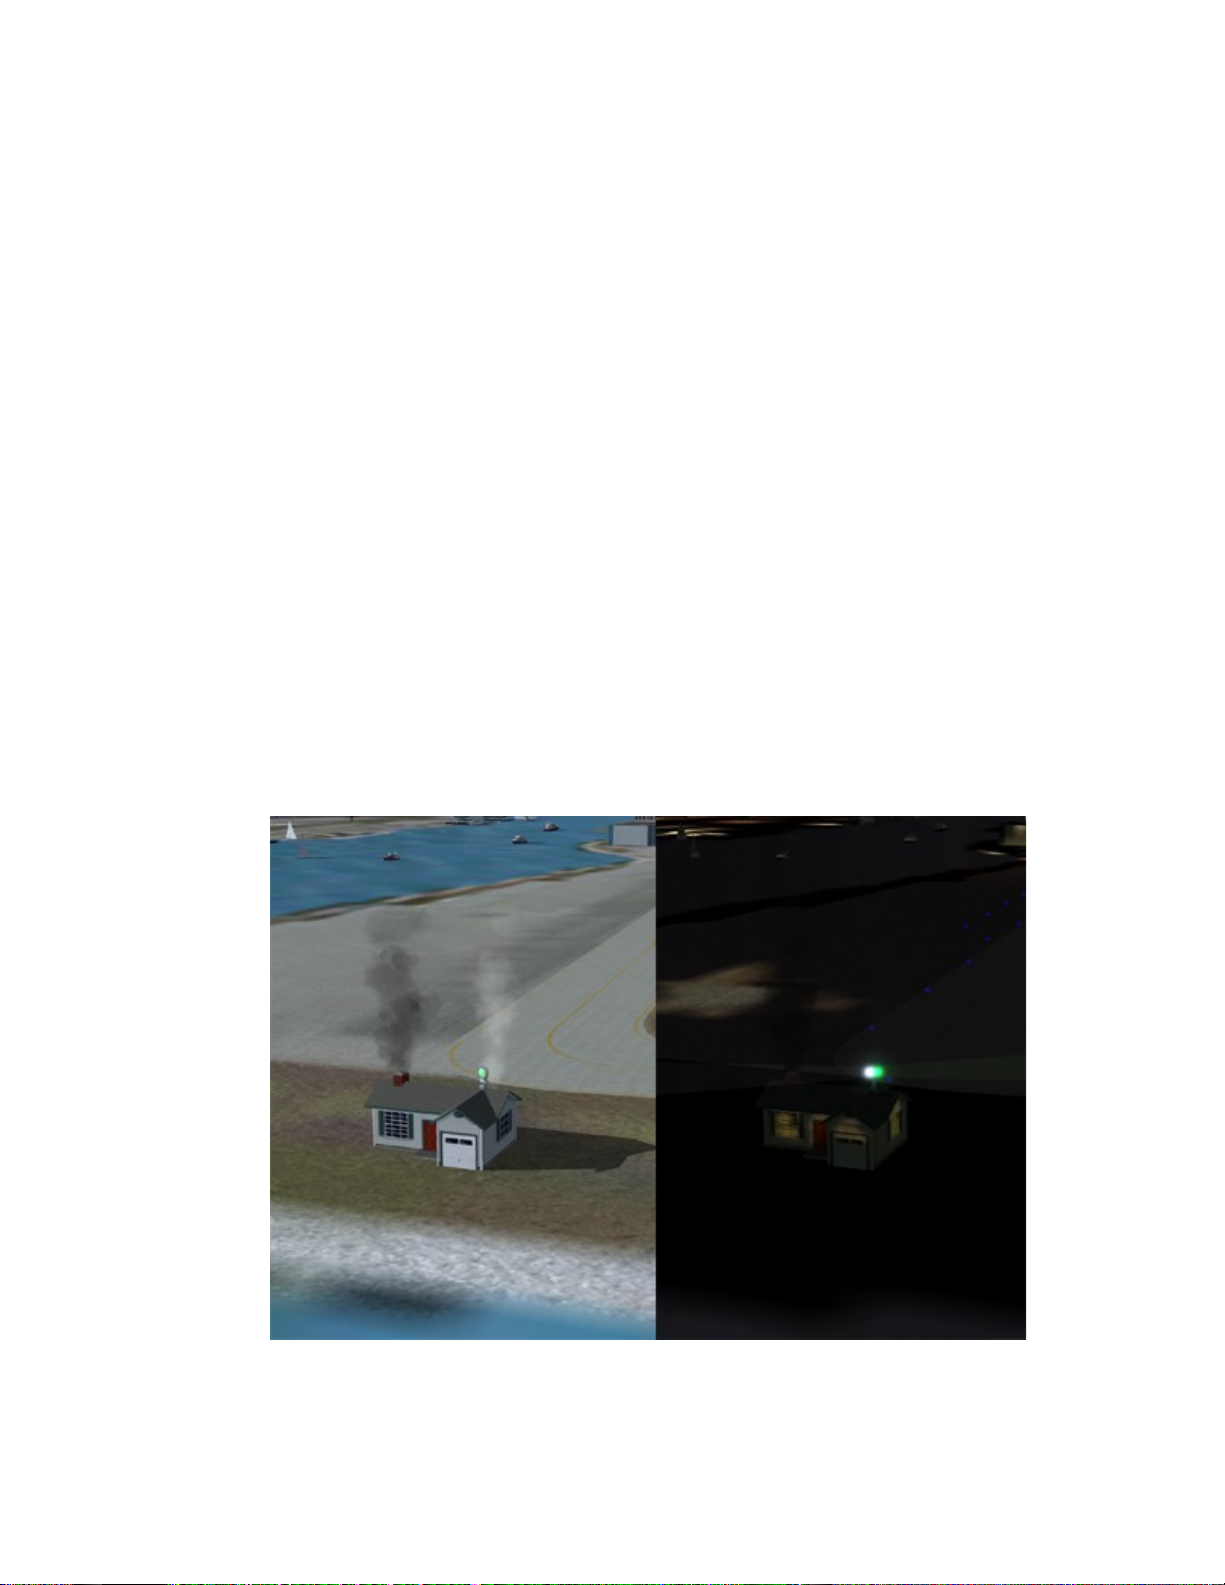
Here is what <Beacon type=" CIVILIAN " baseType=" AIRPORT " /> looks like:
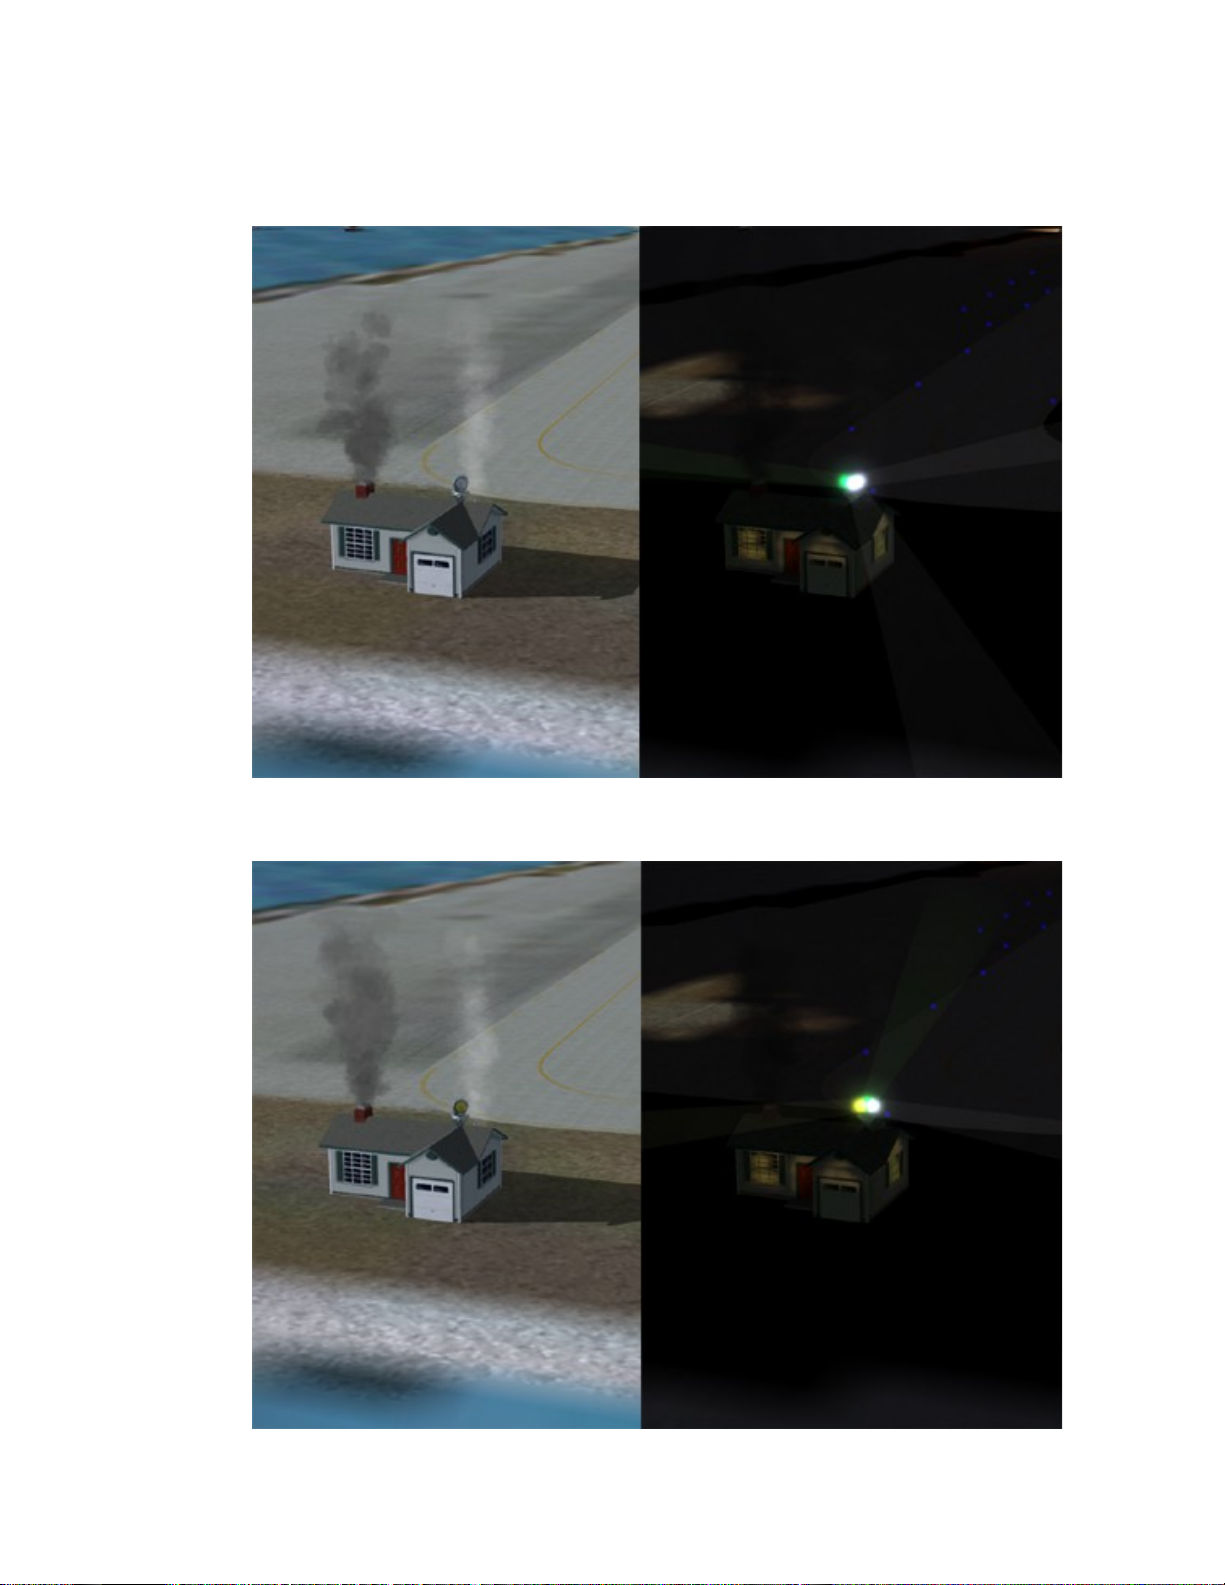
Here is what <Beacon type=" MILITARY " baseType=" AIRPORT " /> looks
like:
Here is what <Beacon type="CIVILIAN" baseType="HELIPORT" /> looks like: