Back to FS2004 SDK Overview

Microsoft
Flight Simulator 2004 :
A Century of Flight
Software Development Kit
© 2003 Microsoft Corporation. All rights reserved.
Discreet and gmax are trademarks of Discreet Logic Inc./Autodesk, Inc., in the U.S.A.
and/or other countries.
gmax Cloud Tool SDK
November 2003

Contents
gmax Cloud Tool SDK........................................................................................................1
November 2003...................................................................................................................1
Contents..............................................................................................................................2
Introduction........................................................................................................................3
Using Scripts in gmax.........................................................................................................4
Using the Cloud Tool in gmax...........................................................................................4
Setup Scene Rollout............................................................................................................6
Create Cloud Rollout..........................................................................................................6
Setup Cloud Groups Rollout............................................................................................12
Prepare Cloud for Export Rollout....................................................................................13

Introduction
Microsoft
®
Flight Simulator 2004 has a highly updated weather system including the use
of realistic, volumetric clouds. These clouds were created using a special MAXScript
tool in 3dsMax that allows a user to define a cloud volume with boxes, which is then
filled with cloud sprites. This SDK will document that MAXScript and show you how to
use the Cloud Tool in gmax. Also, the cloud binary format will be documented for those
that wish to create their own tools.
This script has been run and tested on gmax version 1.2. It may work on earlier versions.
It also has been run and tested on Windows XP. It may work on earlier versions of
Windows.
Using Scripts in gmax
In order to use the Cloud Tool provided, copy CloudTool.ms from the
gamepack\FS2004\scripts folder to your scripts directory within your gmax root
directory. (For example: C:\gmax\scripts). The script does not have to be located in this
directory. A Max Script will work from any directory. However, gmax defaults to this
directory when you run a script, so this makes it a little easier to find and use.
To run a script from gmax, do the following:
1. Start gmax and then click on the Utilities tab within gmax.
2. Click on the MAXScript button in the Utilities rollout. This will open the
MAXScript rollout.
3. On the MAXScript rollout, click on the Run Script button. This will open the
Choose Editor File dialog. Navigate to the script you wish to run, in this case,
CloudTool.ms.
4. Double click on CloudTool.ms. This will evaluate (run) this script.
Using the Cloud Tool in gmax
Once you have evaluated (run) the MAXScript CloudTool.ms, you should see the
Create and Export Clouds dialog, which will look like this:
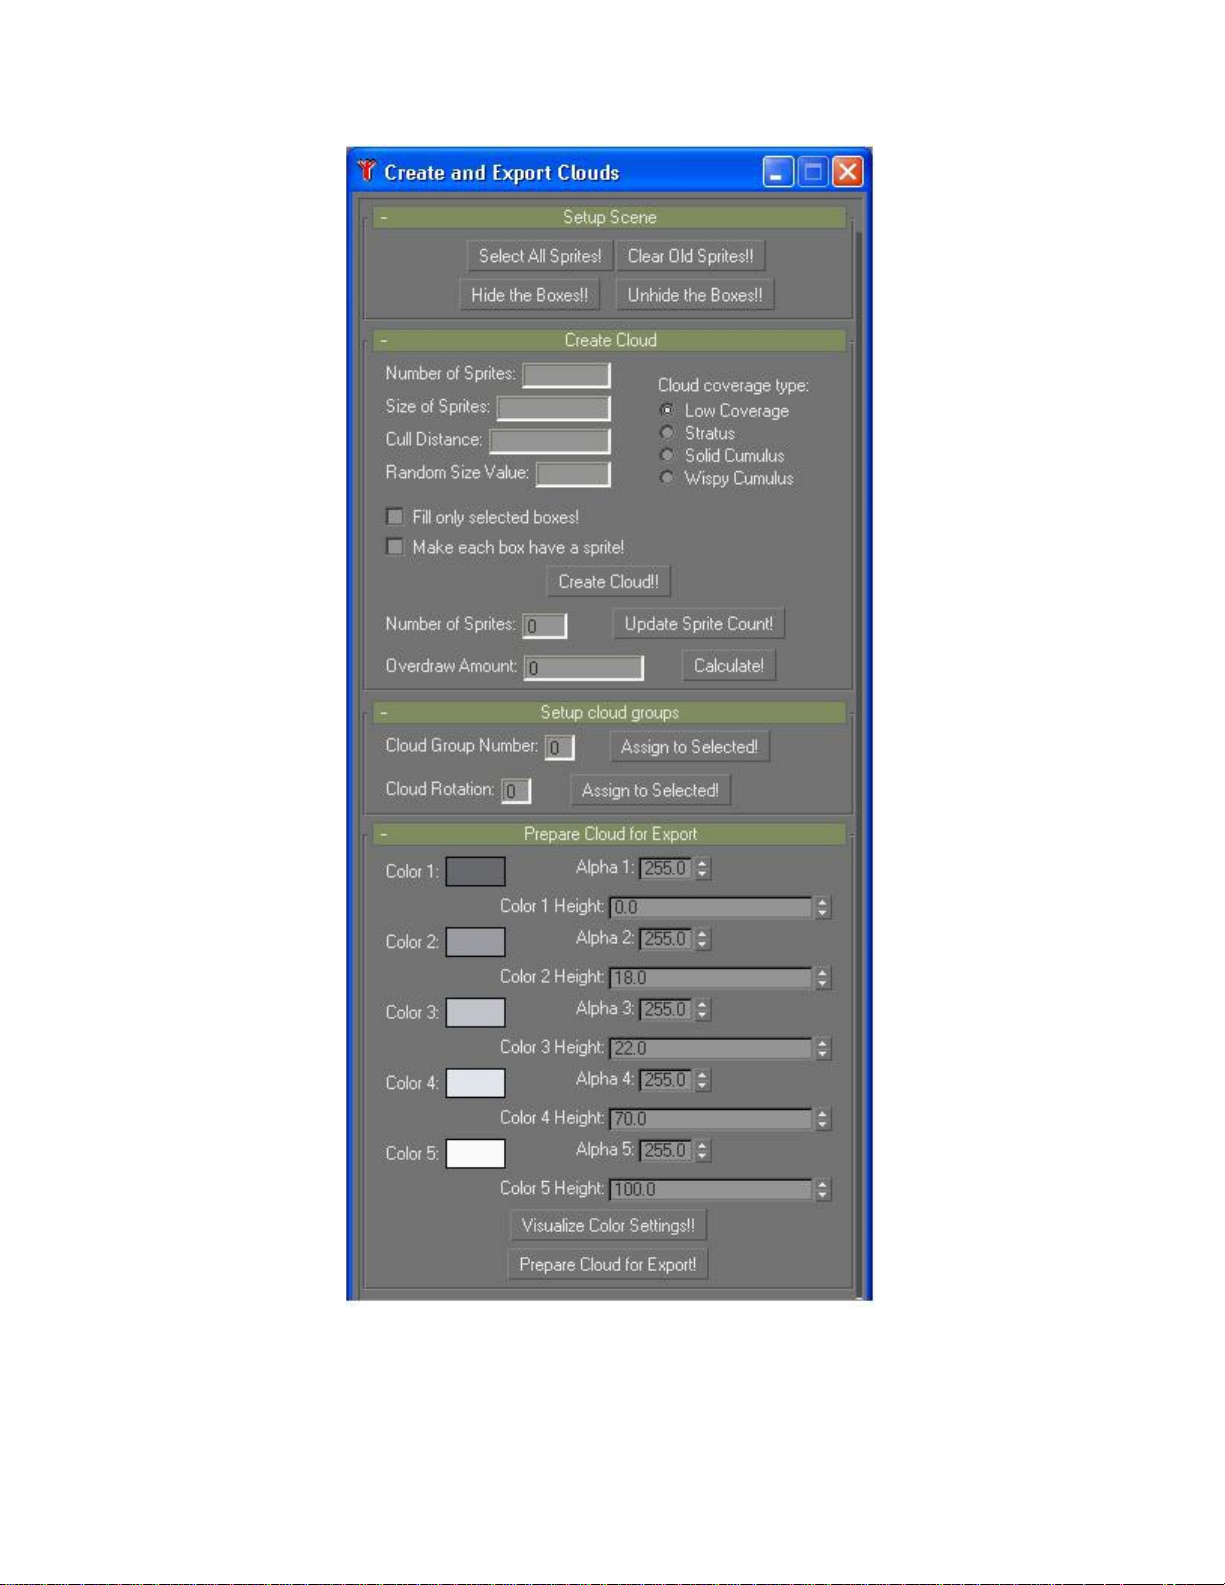
There are four Rollouts in the Create and Export Clouds dialog: Setup Scene, Create
Cloud, Setup Cloud Groups and Prepare Cloud for Export.

Setup Scene Rollout
This Rollout deals with the preparation of the scene for the creation of clouds. Open the
included CumulusCongestus48-1.gmax file (it is located in the
gamepack\FS2004\scenes folder). This is a gmax version of a 3dsMax file that was used
to create one of the actual variations of Cumulus Congestus clouds at 4/8 coverage. At
first glance, it looks a little odd. There is a cloud and a whole bunch of brightly colored
boxes. The brightly colored boxes are what are used to create the cloud shape you see.
The cloud shape consists of many smaller facing sprites or planes, which creates the
volumetric feel of the clouds.
On the Setup Scene Rollout, click the Hide the Boxes! button. Now you can see the
cloud all by itself. Next click the Select All Sprites! button. Notice that all of the cloud
sprites are selected. This comes in handy when you want to move, rotate or scale the
entire cloud. Now click the Clear Old Sprites! button. This will remove all of the
existing cloud sprites. Your scene should now be virtually empty except for the camera
and the bounding box. Click the Unhide the Boxes! button. Now you can see all of the
boxes that were used to create the cloud. You are now ready to re-create the cloud using
the Create Cloud rollout.
Create Cloud Rollout
The scene in CumulusCongestus48-1.gmax is ready for cloud creation, so you should be
able to work right from within this file. It is a good idea to use this included file as a base
file for the creation of new clouds, since it is set up to work properly already. You can
just copy and manipulate the existing boxes, or add new boxes of your own to create
different cloud shapes and types. However, before we get to that, let’s outline some of
the requirements and features of the .gmax file should you want to start from scratch.
1. All of the clouds in Flight Simulator are in 16km x 16km
blocks. If you look at the CumulusCongestus48-1.gmax file, you will see a
bluish-grey box outline that is 16,000 meters long by 16,000 meters wide by
3,000 meters tall. This is a dummy object that has been scaled and then
frozen in gmax. This provides you with a guideline to work around. If you
keep your cloud close to the edges of this box (you can overlap a little bit for
continuity), it will blend with the other clouds in Flight Simulator, because
they are all 16km x 16km. The height of the cloud can be whatever you’d like
for cumulus. Just make sure you put it in the right bucket in the
CloudArtFiles.xml. (More on that in the Prepare Cloud for Export Rollout
section.) For stratus clouds, the cloud will be scaled according to the height
entered in the height field in the Advanced Weather dialog in Flight
Simulator. Create the cloud at some mid-range height like 3,000 to 5,000
meters so that it looks good both large and small. (Also in the Prepare Cloud
for Export Rollout section.)
2. The X and Y dimensions of the cloud should be centered
around [0,0,0] in gmax. The bottom of the cloud should be at 0 in the z
dimension. This is because the altitude of the base of the cloud in Flight
Simulator corresponds to 0 in the z dimension in gmax.
3. When creating boxes, group identically colored boxes
(wirecolor) close to each other and make sure to have a wide variety of
colored boxes. This is because the wirecolor of the boxes gets transferred to
the sprites that fill it. The wirecolor of the sprites get transformed into
Shading Groups in Flight Simulator. Shading Groups determine how the
cloud is lit. If you have only one Shading Group for your entire cloud, the
highlights and shadows will be spread out over 16km. If you have too many
Shading Groups, the cloud will look spotted. Take a look at the color
distribution in CumulusCongestus48-1.gmax for a good idea of how many
Shading Groups to have.
4. You can make sure that a box only gets filled with one type
of sprite by giving it a specific name. If you look at the names of the boxes in
CumulusCongestus48-1.gmax, you will see that there are a few different
names for the boxes. Any box that is named Box* will get filled by the type
of sprite called out in the Create Cloud radio buttons. Any box named
Stratus* will be filled only with sprites using the Stratus textures. Any box
named Solid* will be filled only with sprites using the Solid Cumulus
textures. Any box named Wispy* will be filled only with sprites using the
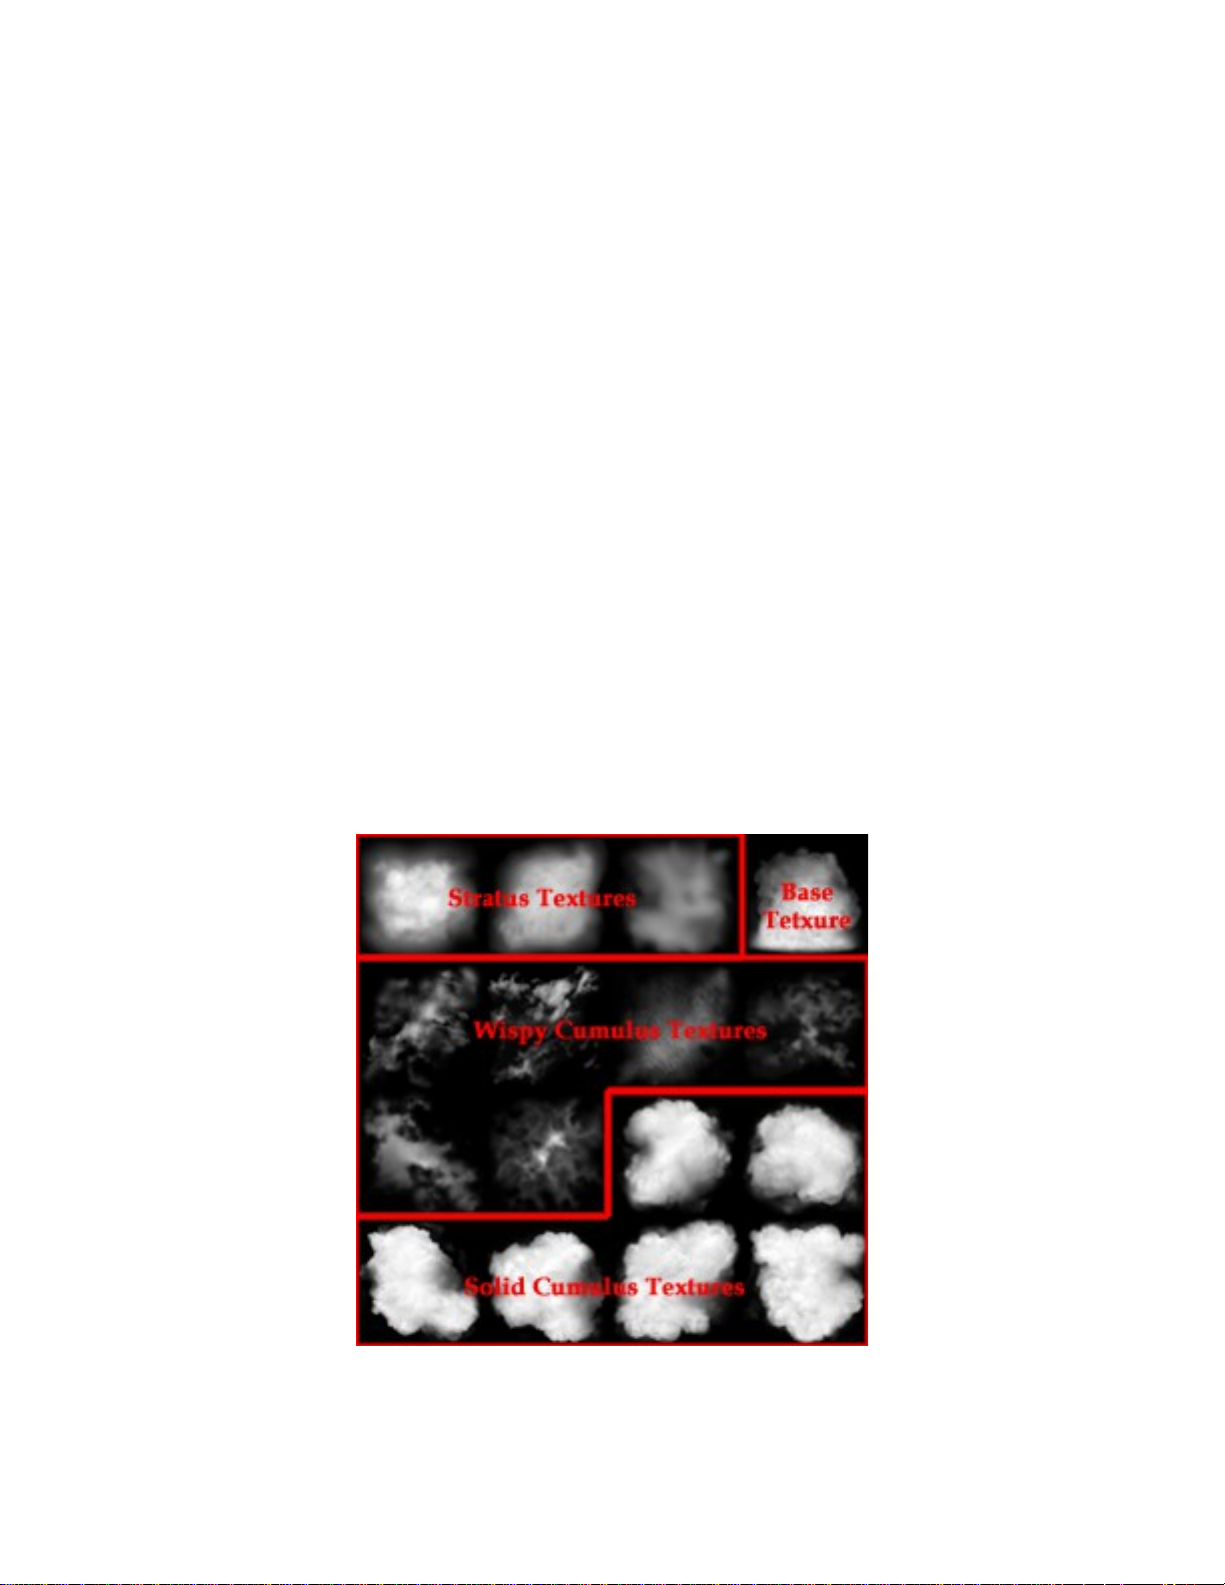
Wispy Cumulus textures. Any box named Base* will be filled only with
sprites using the Base texture and those sprites will have their rotation limited
from -5 to 5 degrees. Below is the Cumulus01 texture sheet and the locations
of the various categories of textures:
NOTE: Do not name any box “Plane*”. This will potentially confuse the export
process later on. This is because the sprites that fill the boxes will be named
“Plane*”.

2. You should have only one material in your scene. It should reference the
included Cumulus01.tga as a map in both its color and alpha channels (if you
want the cloud to show up close to how it will look in Flight Simulator).
3. NOTE: If the texture does not show up in the viweport or in the material, this is
because the path to it doesn’t exist anymore (because of the new machine and new
relative paths.) Make the material look for the texture in
gamepack\FS2004\texture.
4. There must be a target camera in the scene named Camera01. If there isn’t, the
script will fail because it is trying to align all of the sprites to Camera01.
In order to create a cloud in 3dsMax, you must use the Create Cloud rollout on the
Create and Export Clouds dialog. Since you have removed all the sprites from the
CumulusCongestus48-1.gmax file, you are now ready to re-create the cloud from
scratch. To do this, you must fill in some of the text boxes with appropriate numbers and
choose from a variety of options. Here is what each of the inputs means:
1. Number of Sprites: This is the
number of sprites you want to initially fill the box volumes with. When you
press the Create Cloud!! button, 3dsMax will figure out the volume ratio of
each box to the volumes of all the boxes combined and fill that box with a
corresponding ratio of sprites to the total number of sprites. So if the box it is
filling is 1/100 of the total ratio of box volume, and you have entered 500
sprites in the Number of Sprites: field, it will fill that box with 5 sprites.
Simply put, the bigger the box, the more sprites it gets.
2. Size of Sprites: This is the sprite
diameter in meters.
3. Cull Distance: When 3dsMAX fills
the boxes with sprites, for each sprite it randomly choses an x,y,z coordinate
within each box’s bounding range and places the sprite at that location.
Because random does not necessarily mean even distribution, you will
sometimes see clumps of sprites together (this also happens if you overlap the
boxes). The Cull Distance helps to mitigate this somewhat. When all of the
sprites have been placed, 3dsMax goes back through each sprite and checks
the distance from its center to every other sprite in the scene. If the distance is
less than (1/Cull Distance * diameter of sprites) then 3dsMax deletes that
sprite. Simply put, a very high Cull Distance will keep more sprites around.
A very low Cull Distance will keep less sprites around.
4. Random Size Value: This is the
amount of variation in the sprite size in meters. If you have entered 1300 in
the Size of Sprites text box and 100 in the Random Size Value, your sprites
will be anywhere from 1200 to 1400 in diameter.
5. Fill only selected boxes!: If this
check box is checked, when you press the Create Cloud! button, 3dsMax will
fill only the boxes that are selected with sprites.
6. Make each box have a sprite!:
This guarantees that every box will have a sprite. If you have 500 boxes and

try to fill them with 300 sprites, this will guarantee that every box gets a sprite
regardless.
7. Cloud Coverage Type: The type of
the cloud is determined by which portion of the Cumulus01 image gets
applied to the sprites as they are created. If there are multiple textures within
a type of cloud (as there are with Stratus, Wispy Cumulus and Solid
Cumulus textures), each time a sprite is created, it gets assigned a random
texture from within that type. There are four types of cloud coverage that can
be assigned to the sprites in a cloud using the Cloud Tool: Low Coverage,
Stratus, Wispy Cumulus and Solid Cumulus.
• Low Coverage applies only the Wispy Cumulus Textures to each sprite.
• Stratus applies only the Stratus Textures to each sprite.
• Wispy Cumulus applies both the Wispy Cumulus Textures and the
Solid Cumulus Textures to each sprite.
• Solid Cumulus applies only the Solid Cumulus textures to each sprite.
You can also determine which textures get assigned to the sprites by naming
the boxes. The names of boxes that will affect texture type are: Base*,
Solid*, Wispy* and Stratus*. Any sprite placed within that box will get the
corresponding texture type. That’s why CumulusCongestus48-1.max has all
of those boxes way below the bottom of the cloud. Those are all named Base,
which means they will get filled with the base texture. The base texture has a
flat bottom—something most clouds tend to have. Using box naming and the
Cloud Tool, you can create a wide variety of clouds. If you name all of the
bottom boxes Base, and then leave all of the bulk of the cloud named Box*
and then name all of the boxes on the very edge of the cloud Wispy, and then
choose Solid as your cloud coverage type, you should see a dense cloud that
has a flat bottom and wispiness all around the edges.
8. Create Cloud: This button will start
the cloud creation process. It may take a minute or two, so don’t panic if you
don’t see results immediately.
9. Number of Sprites and Update
Sprite Count: These display the current number of sprites in the cloud.
Because of the Cull Distance text box and the Make each box have a sprite
check box, you won’t necessarily end up with the same number of sprites as
what you entered in the Number of sprites text box. After pressing the
Create Cloud button, it counts and displays the number of sprites in the
cloud. At any time, if you press the Update Sprite Count button, it will
update the text box with the current number of sprites in the scene.
10. Overdraw Amount and Calculate:
The Overdraw Amount text box is a very rough way of determining the
performance of this particular cloud in Flight Simulator. When you press the
Calculate button, gmax will compare the total amount of area the sprites are
covering to the16 x 16 km block. The number displayed is the ratio of these
two areas. If the Overdraw Amount shows 2, then you are covering the area
of the 16 x 16 km block twice over. This means at any given point, there will
be two sprites overlapping each other. This overlapping of alpha textures is a
big performance hit. If you can keep the cloud under 5 or 6 in the Overdraw
Amount, it should perform pretty well. If you go much over 10, you may
have serious performance problems. Once again, this is a very simple way of
calculating overdraw, so you may see some anomalies, but it is a reasonable
baseline for checking the performance of your clouds.
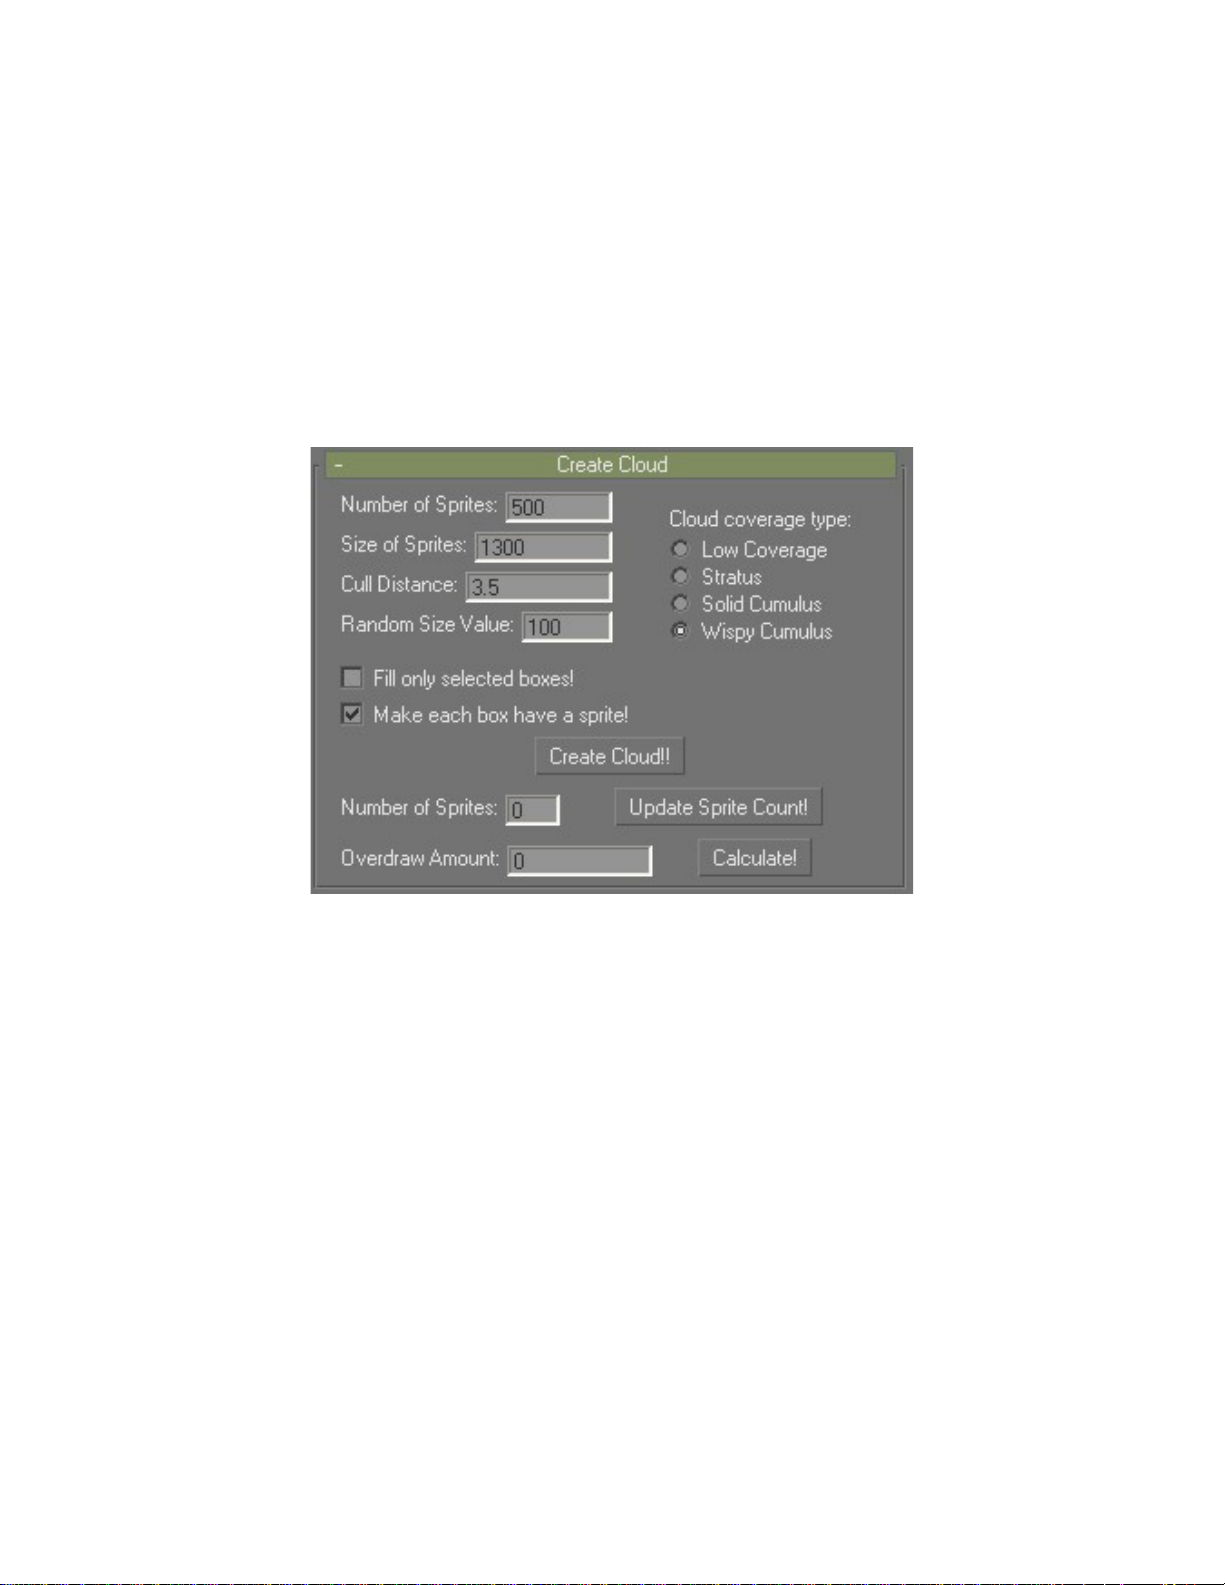
Let’s create a cloud now. Make your Create Cloud rollout look like this (this is a good
starting point, feel free to try different settings for different results):
Once you have entered all of the information, press the Create Cloud! button. The
creation of the cloud may take a little while. The progress bar at the bottom of gmax
should let you know roughly where you stand in progress. When the cloud creation is
finished, it will hide the boxes, update the Sprite Count and show the sprites. This is
roughly what it should look like:
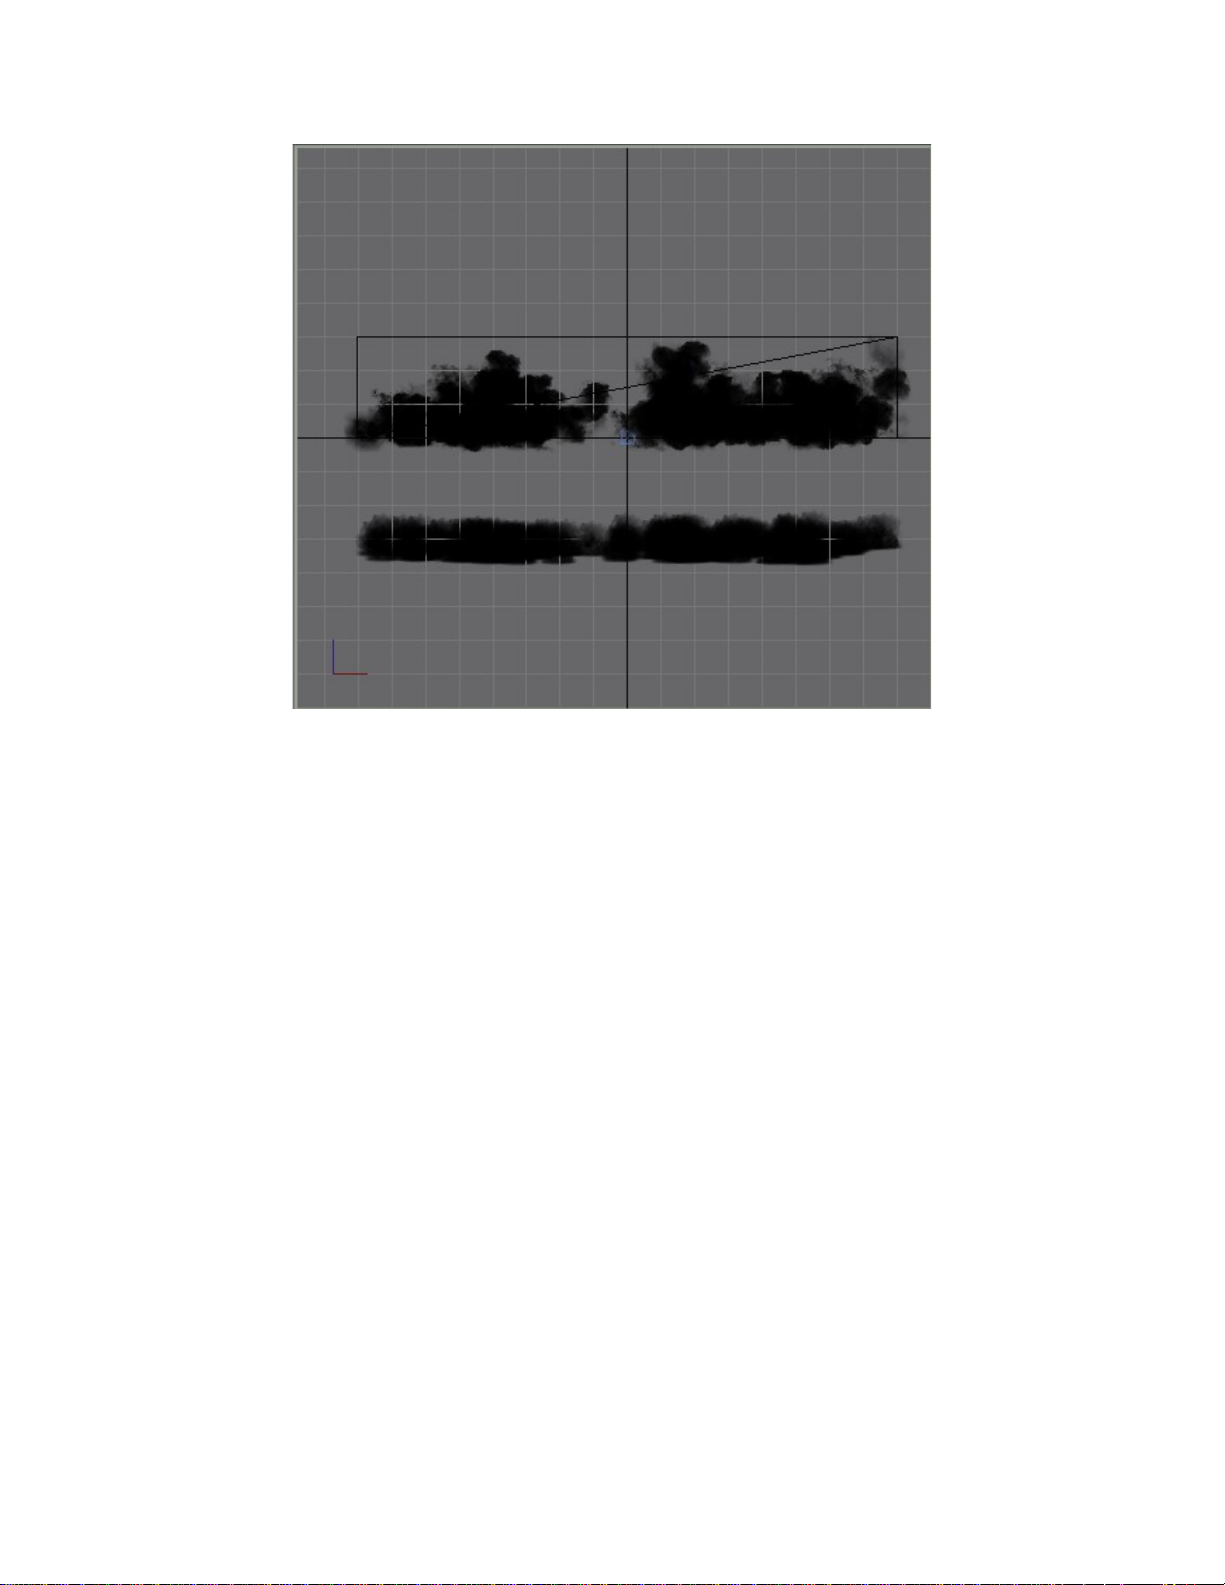
The cloud appears all black in gmax because there is no lighting. This will get fixed later
in the Prepare Cloud for Export section. Notice that the bottom of the cloud is way
below 0. We separate out the bottom of the cloud because it is easier to line up and
tweak this way. Select all of the Base sprites (the ones below the cloud) and move them
up to line up with the bottom of the cloud, so it looks like this:
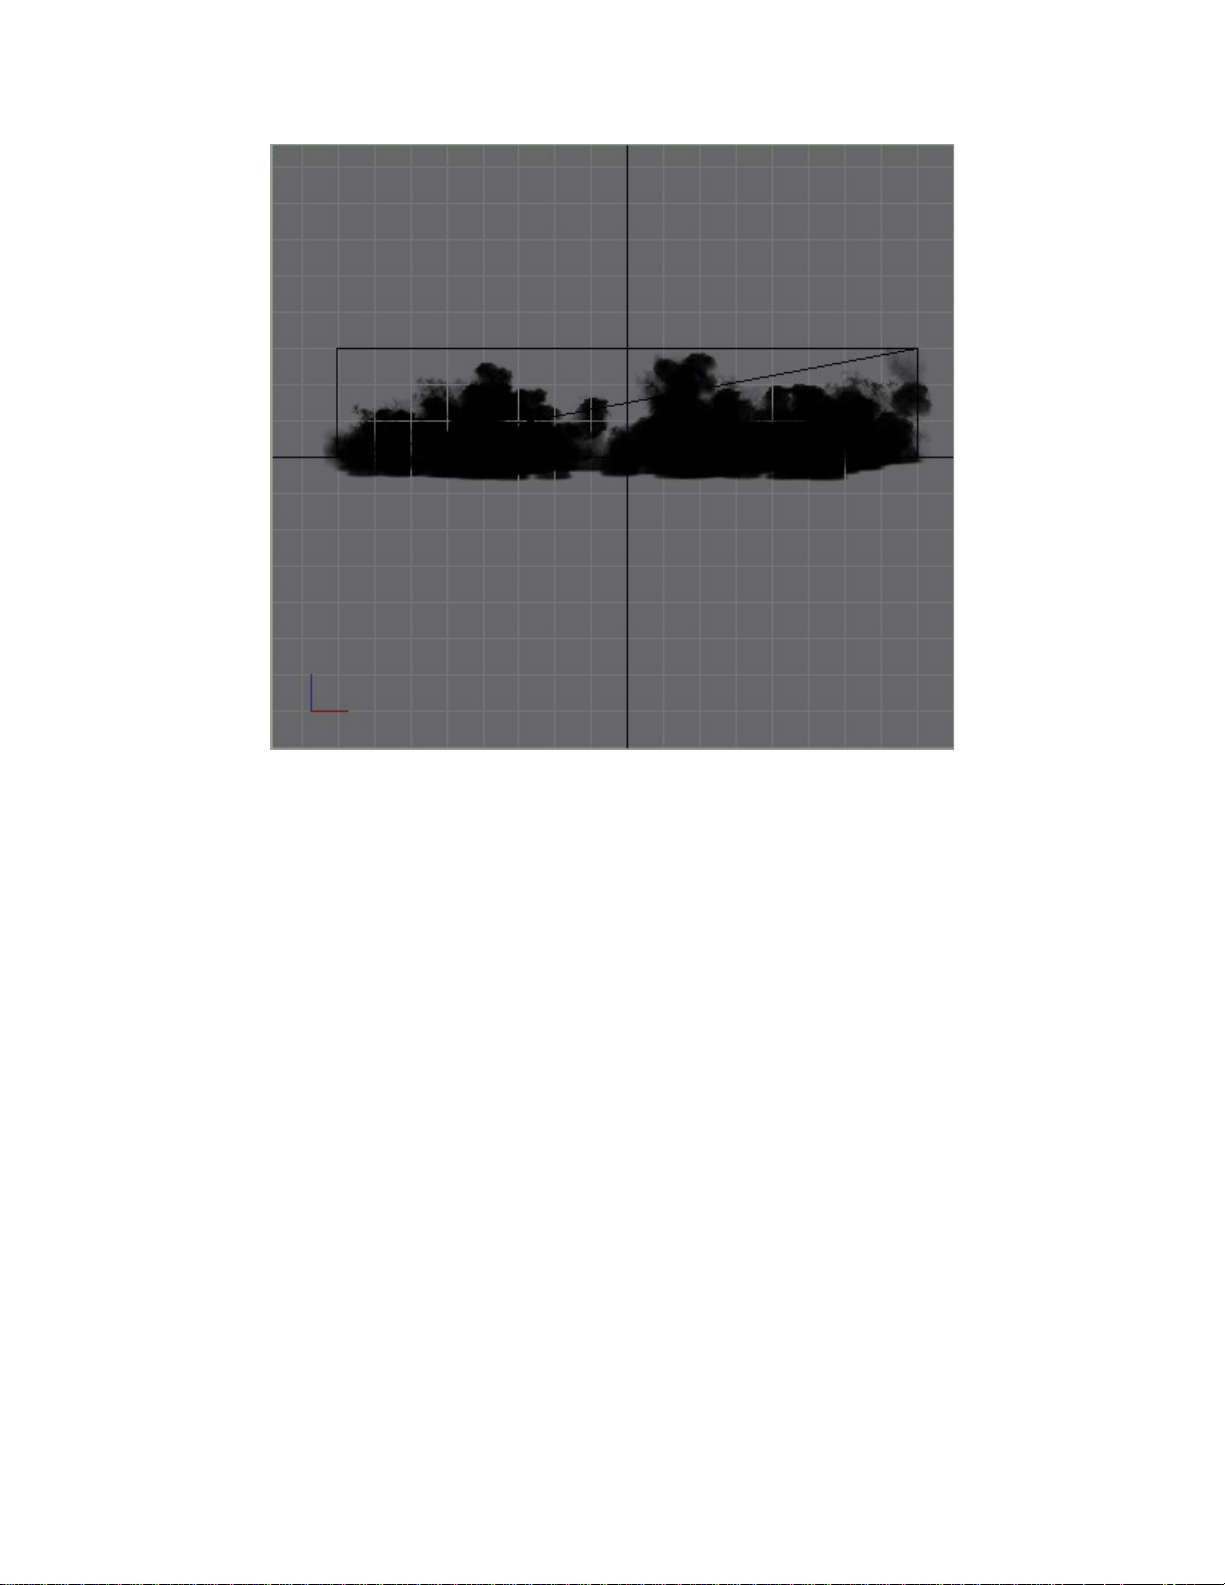
Feel free to manipulate the sprites in any manner once the cloud has been created. We
often use what the tool does as merely a starting point for the creation of a cloud. You
can also view the cloud from all angles by manipulating Camera01. The sprites will face
you as you move the camera, just like they do in Flight Simulator. In fact, what you see
in gmax should be a very close approximation of what you will see in Flight Simulator.
Setup Cloud Groups Rollout
The Setup Cloud Groups rollout is used to do two things: define Cloud Groups and
limit Cloud Rotation.
Curently, Cloud Groups are used for dynamically fading clouds in and out when the
weather changes. They allow us to fade clouds out based on smaller units, rather than
just the whole 16km x 16km block of clouds. All sprites must be associated with a cloud
group or you will get an error when you try to export.
To create Cloud Groups, select a small batch of sprites that would reasonably make up 1
small “cloud”. Then press the Assign to Selected button next to the Cloud Group
Number text box. It will put the following in the User Defined Properties of the
selected sprites: Cloudgroup = 0. It will also increment the Cloud Group Number text
box by 1. This allows you to quickly assign Cloud Group without having to type in a
new number each time (“What number was I on again?”).
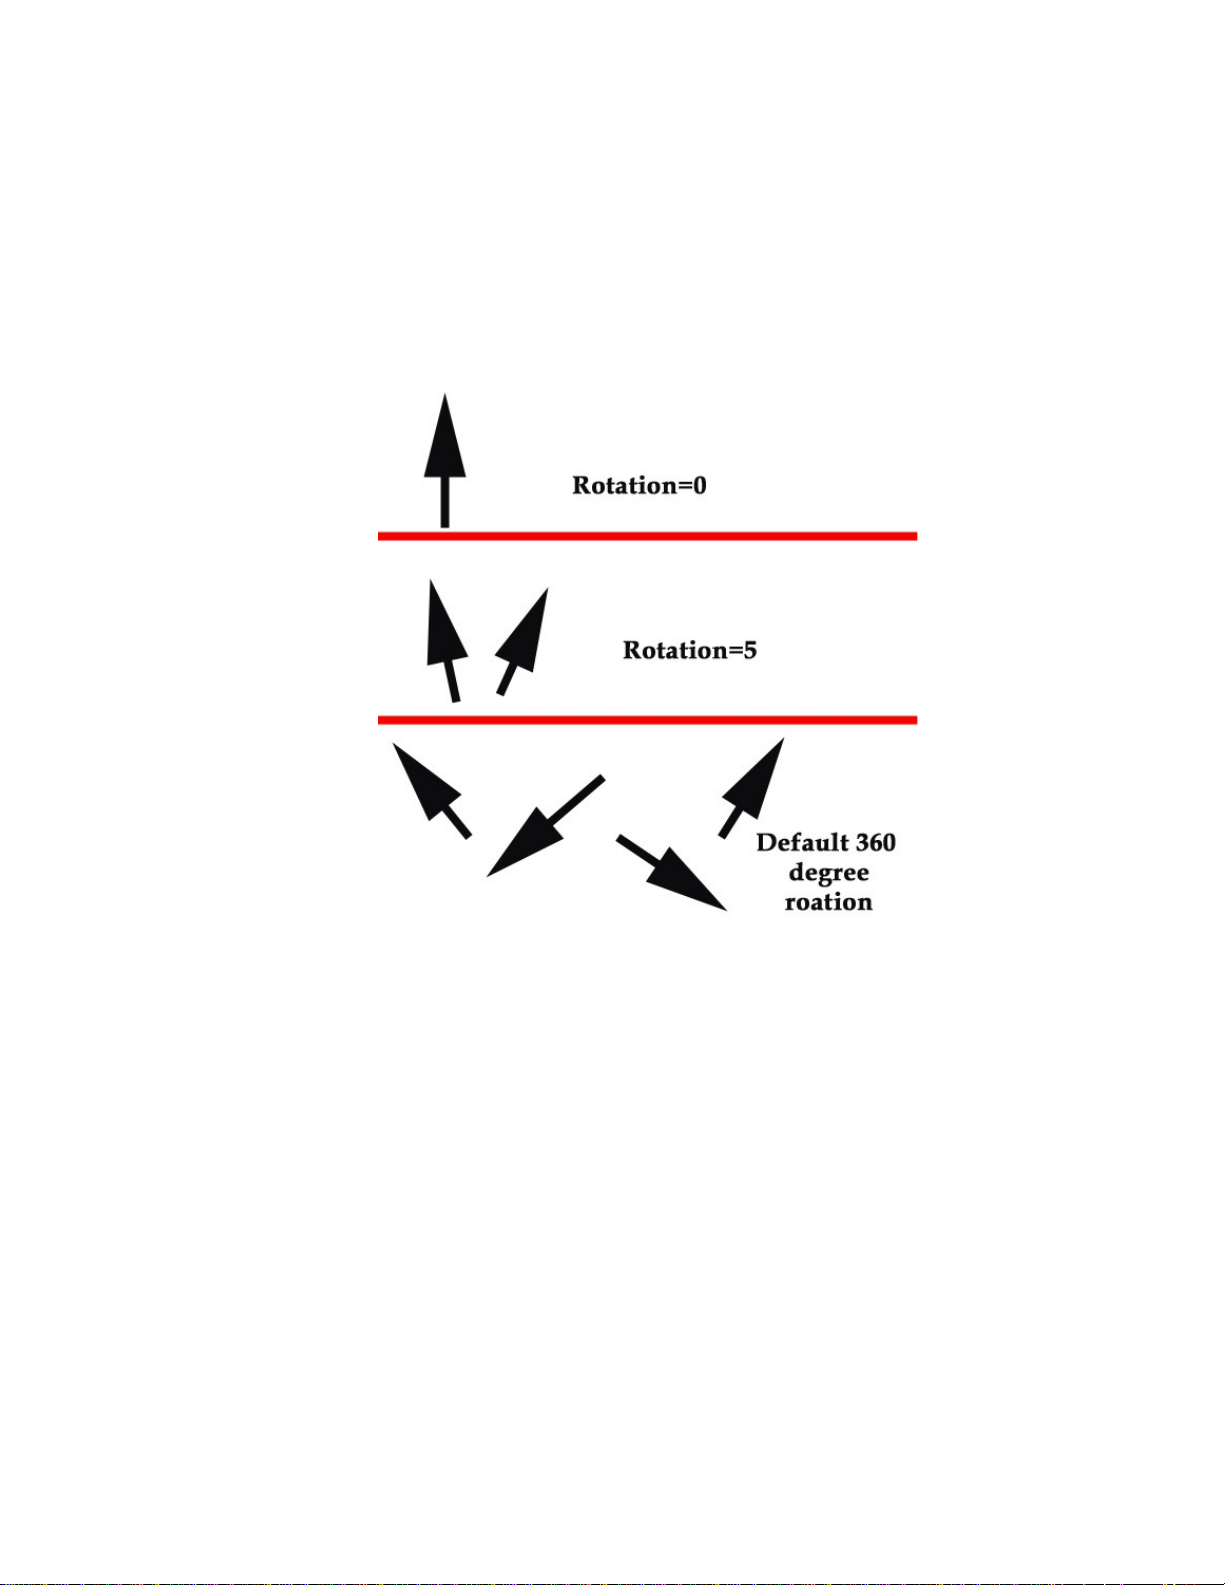
When sprites are displayed in Flight Simulator, they default to a full 360 degree random
rotation. This allows you to use less textures and get more variation. If you want to limit
the rotation of a sprite (like you would for the Base textures), use the Cloud Rotation
text box to do so. If you name a box Base* when creating the cloud, it will automatically
put Rotation=5 into the User Defined Properties of all the sprites created within that
box. This means that the sprite will never rotate more than +5 or -5 degrees off of 0
degrees. A 0 degree rotation means that when a sprite is facing you, the top of the texture
will always be pointing up in Flight Simulator:
If you want to set rotation on sprites, first select them. Then type in the rotation value in
the Cloud Rotation text box. Then press the Assign to Selected button directly next to
the Cloud Rotation text box. If you right click on the sprites and look at their user
properties, it should say Rotation=[rotation amount]. Note: Due to some limitations in
gmax’s look at controls, you cannot view rotation in gmax as it would appear in game.
Prepare Cloud for Export Rollout
This section will explain how to set up your cloud so that it can be exported using the
FSModelExp.dle that comes with the makeMDL and gmax scenery tutorial
documents. It is a good idea to save the cloud now. During the setup process,
information about each sprite (in this case, anything named “Plane*”) will be added into
its User Defined Properties. Global information about the whole cloud will be added in
the User Defined Properties of Camera01. Here is how to prepare a cloud for export:
The color levels are used to create a sort of performance enhancing pre-lighting condition
for the clouds in the sim. Because it is very expensive to calculate lots of real-time

lighting on the fly for every single sprite in every single cloud in Flight Simulator, we do
a sort of precalculation to get us half way there. (We still do calculate lighting on the fly
for all the clouds, but the color levels allow us to do simpler calculations.)
The color levels mimic the fact that light tends to come from above the clouds (the sun)
and travel through them. As this happens, the density of the cloud and the moisture
particles deflect and diffuse the light, causing the bottoms of the clouds to appear much
darker than the tops, especially for denser cloud coverages. There are 5 color levels that
can be applied to the cloud upon export preparation. Each of these color levels has 3
possible settings. Here is a description of the color levels and export preparation process:
1. Color[number] Height: This is the percentage of the total height of the cloud at
which the Color[number] and Alpha [number] will take effect. If you have set
Color1 Height at 20.0 and Color1 at pure black (0,0,0), then the bottom 20% of
the cloud will be pure black. It will then interpolate to the next color over the
course of the next height percentage specified. So if Color2 is pure red (255,0,0)
and Color2 Height is 50.0 then it will interpolate from black to red over the next
30% of the cloud height.
2. Color[number]: This is the color that will be displayed at the Color[number]
Height. Flight Simulator changes the color of the vertices of the sprites top
achieve this effect. What this means is that if you have a very thin cloud layer
where all of the bottom vertices are very close together in the Z dimension and all
of the top vertices are very close together in the Z dimension, you probably won’t
see all 5 color levels very clearly because there are no vertices in the middle 20-
80% to be colored.
3. Alpha[number]: 0-255. This is the level of alpha that will be applied to the
vertices at Color[number] Height. 0 is 100% transparent. 255 is 100% opaque.
This is handy for fading a cloud out as it gets taller or giving the whole cloud a
wispy feel. Unfortunately, gmax is unable to display this in the viewport, so some
trial and error may be necessary to find the values you are looking for. Generally
a value of 255 across the board will give you something very similar to what you
see in gmax. Plus, it will avoid more alpha overdraw which is a performance
killer.
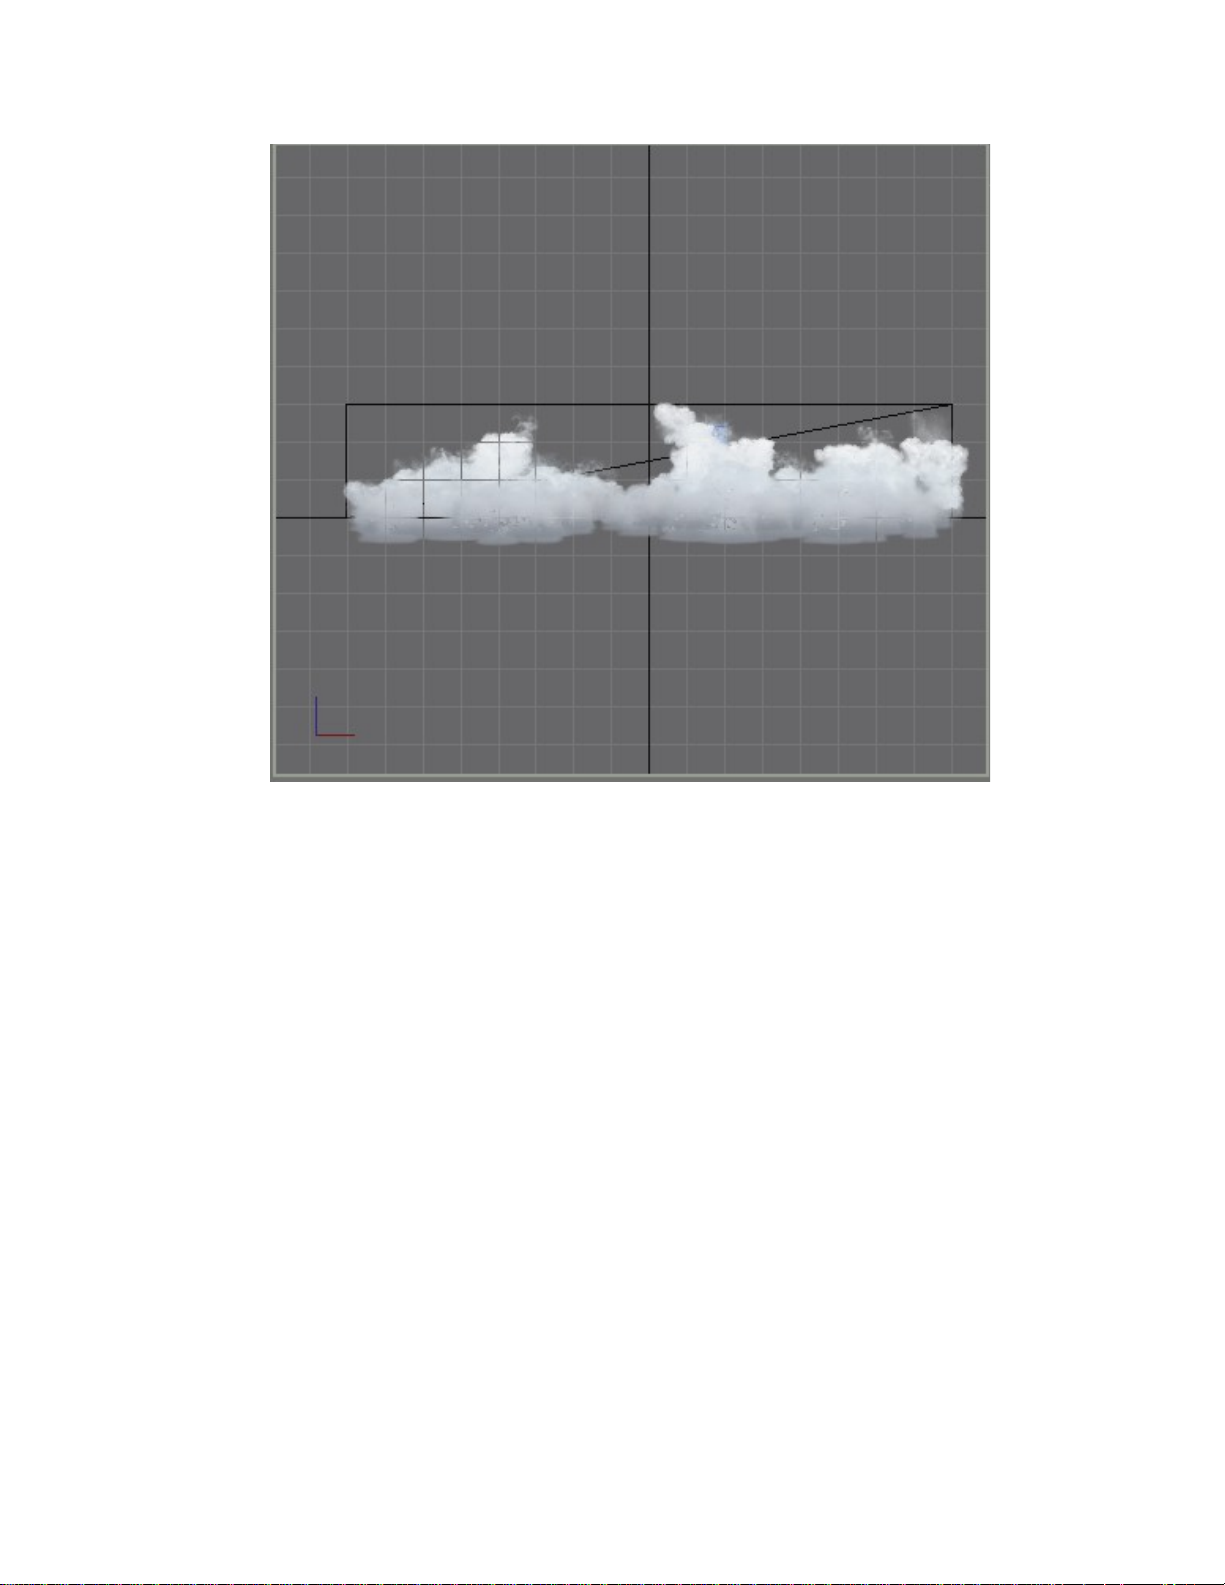
4. Visualize Color Settings!: This button will take all of the color level inputs and
give an approximation of what will appear in Flight Simulator. The default
settings are generally pretty good for cumulus type clouds. Feel free to tweak and
visualize to get the best settings for any given cloud type. Try much darker bases
for thunderstorm clouds or much lighter bases for very thin clouds. You can also
use this to create incredibly bizarre color settings as well (try dark brown, olive
green and orange for those 70’s living room clouds). This is roughly what the
gmax file should look like using the default color levels:
5.
6. Prepare Cloud for Export: This button sets up the scene so that the cloud can
be exported using the FSModelExp.dle plugin. The only thing that needs to be
adjusted for this to work is the color levels as described above. Press the Prepare
Cloud for Export button. There should be a pause where it appears that nothing
is happening (Unless you get the “#(Plane*) does not have a cloud group number.
Please assign one!” error, which means that you need to go back to the Setup
Cloud Groups Rollout and make sure every sprite is in a cloud group.) During
this time, what gmax is doing is putting all of the properties needed for export into
the various sprites’ User Defined Properties. It is also putting the global file
properties into Camera01’s User Defined Properties.
7. To export the cloud, choose Export… from the File menu. This will bring up the
Select File to Export dialog. Choose to export file of type Flightsim Cloud
(.CLD). Navigate to the location that you want to export to and chose an
appropriate name and then press Save.
8. Copy any .cld file that you have created to C:\Program Files\Microsoft
Games\Flight Simulator 9\Weather\clouds (or the clouds directory wherever
Flight Simulator is installed on your machine).
9. To view your new clouds in the sim, you’ll need to edit the CloudArtFiles.xml,
which is installed with Flight Simulator 2004 in C:\Program Files\Microsoft
Games\Flight Simulator 9\Weather\clouds. This file determines what type of

clouds appear at what coverage. Open this file in Notepad or another text editor.
The first few lines of the file should look something like this:
<?xml version="1.0"?>
<!-- XML file for locating cloud art files. -->
<CloudFiles xmlns="x-schema:CloudArtSchema.xml">
<cloud description="altocumulus">
<coverage amount = "5">
<variation file="_altocumulus58-5s.cld"/>
<variation file="_altocumulus58-6s.cld"/>
<variation file="_altocumulus58-7s.cld"/>
<variation file="_altocumulus58-8s.cld"/>
</coverage>
<coverage amount = "6">
<variation file="_altocumulus68-20s.cld"/>
<variation file="_altocumulus68-13s.cld"/>
<variation file="_altocumulus68-11s.cld"/>
<variation file="_altocumulus68-12s.cld"/>
</coverage>
<coverage amount = "7">
<variation file="_altocumulus78-4s.cld"/>
<variation file="_altocumulus78-5s.cld"/>
<variation file="_altocumulus78-6s.cld"/>
<variation file="_altocumulus78-7s.cld"/>
<variation file="_altocumulus78-10s.cld"/>
</coverage>
<coverage amount = "8">
<variation file="_altocumulus88-10s.cld"/>
<variation file="_altocumulus88-11s.cld"/>
</coverage>
</cloud>
When Flight Simulator calls cloud type “altocumulus” with a coverage amount of
“5”, it will chose between the 4 files listed above (_altocumulus58-5s.cld,
_altocumulus58-6s.cld, _altocumulus58-7s.cld, _altocumulus58-8s.cld). Find the
appropriate bucket for your cloud, and just insert it into the file like this:
<coverage amount = "7">
<variation file="_altocumulus78-4s.cld"/>
<variation file="_altocumulus78-5s.cld"/>
<variation file="_altocumulus78-6s.cld"/>
<variation file="_altocumulus78-7s.cld"/>
<variation file="_altocumulus78-10s.cld"/>
<variation file="MyCloud.cld"/>
</coverage>
Now your cloud will show up mixed in with the rest of the 7/8 coverage clouds.
It can be very difficult to tell sometimes if your cloud is actually showing up in
Flight Sim, so use the included CloudArtFilesAllOne.xml as a test tool. (It is
located in the gamepack\FS2004\extras folder.) What this does is make every
single coverage reference one cloud: Test.cld. If you export your cloud as
Test.cld, and then rename your CloudArtFiles.xml to CloudArtFilesReal.xml

and then rename the CloudArtFilesAllOne.xml to CloudArtFiles.xml, you
should see the Test.cld no matter what kind of weather you select.
A note about CloudArtFiles.xml and clouds in Flight Simulator: In an effort to
provide the most realistic weather possible, we had to treat different types of
clouds differently. The reason there are far less variations of Stratus clouds is
because they are scaled to the desired height of the cloud layer. This means that
in the sim, if you set a cloud layer to be Stratus and 6000’ tall, the cloud will get
scaled vertically 6000’. Because Stratus tend to have that “wet blanket” effect,
this looks okay. However, we quickly discovered that scaling cumulus clouds
made them look terrible most of the time. So rather than scaling them exactly, we
put them into buckets and didn’t scale them at all.
• Cumulus Humilis are cumulus layers shorter than 3000’.
• Cumulus Mediocris cover from 3000-6000’.
• Cumulus Congestus cover from 6000-9000’.
• Towering Cumulus and the Cumulonimbus clouds cover heights above
9000’.
So keep this in mind when creating clouds and editing the CloudArtFiles.xml. If
you want your cumulus clouds to look realistic according to conditions, make sure
they are put in the right bucket.