Questions and answers
Questions about MSFS 2020
The problem occurs due to the length of the path to the "Community" folder. If this path is too long, the Rikoooo installer will not be able to succeed because some mods contain files with extremely long names. To solve this problem, you will need to shorten the path to the "Community" folder.
To determine if you are affected by this issue, you can download this small program that will show you the path to your "Community" folder: https://www.rikoooo.com/downloads/viewdownload/147/995/. If the displayed result is similar to this one, then you are also affected:

Step 1: Open Windows File Explorer.
Step 2: Go to the installation folder for Microsoft Flight Simulator. "C:\Users\Your username\AppData\Local\Packages\Microsoft.FlightSimulator_8wekyb3d8bbwe\LocalCache\Package".
Step 3: In this folder, you should see a folder called "Community" and a folder called "Official". Right-click on them and select "Cut".
Step 4: Now go to the location where you want to move the "Community" and "Official" folders. Create a new folder at the desired location to move the content. For example, in "C:\MSFS_Contents\" (you can also choose a location on another drive).
Step 5: Right-click on this location and select "Paste" to paste the "Community" and "Official" folders.
Step 6: Start MSFS, you will then be prompted to specify the location of the new folder. At this point, please specify the new location you just created using the following path: "C:\MSFS_Contents\"
That's it! From now on, the content of your "Community" and "Official" folders will be accessible from their new locations, and MSFS will also be able to find the mods and sceneries added in these folders.
To determine if you are affected by this issue, you can download this small program that will show you the path to your "Community" folder: https://www.rikoooo.com/downloads/viewdownload/147/995/. If the displayed result is similar to this one, then you are also affected:

Here are the steps to move the "Community" and "Official" folders to a shorter path for Microsoft Flight Simulator:
Step 1: Open Windows File Explorer.
Step 2: Go to the installation folder for Microsoft Flight Simulator. "C:\Users\Your username\AppData\Local\Packages\Microsoft.FlightSimulator_8wekyb3d8bbwe\LocalCache\Package".
Step 3: In this folder, you should see a folder called "Community" and a folder called "Official". Right-click on them and select "Cut".
Step 4: Now go to the location where you want to move the "Community" and "Official" folders. Create a new folder at the desired location to move the content. For example, in "C:\MSFS_Contents\" (you can also choose a location on another drive).
Step 5: Right-click on this location and select "Paste" to paste the "Community" and "Official" folders.
Step 6: Start MSFS, you will then be prompted to specify the location of the new folder. At this point, please specify the new location you just created using the following path: "C:\MSFS_Contents\"
That's it! From now on, the content of your "Community" and "Official" folders will be accessible from their new locations, and MSFS will also be able to find the mods and sceneries added in these folders.
on
Saturday April 22
Questions about simulators FSX/P3D
This process works on both Prepar3D and FS2004.
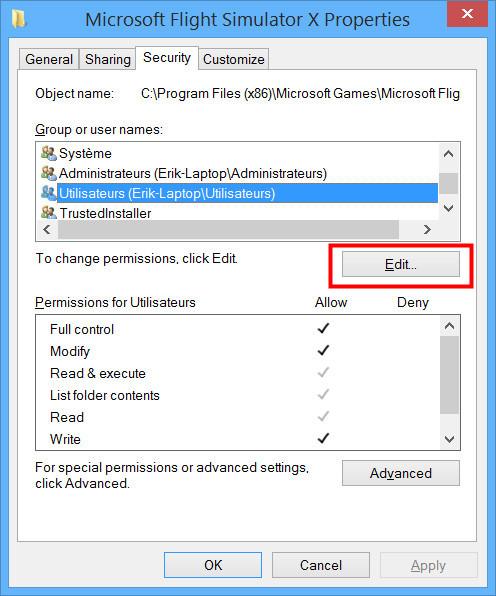
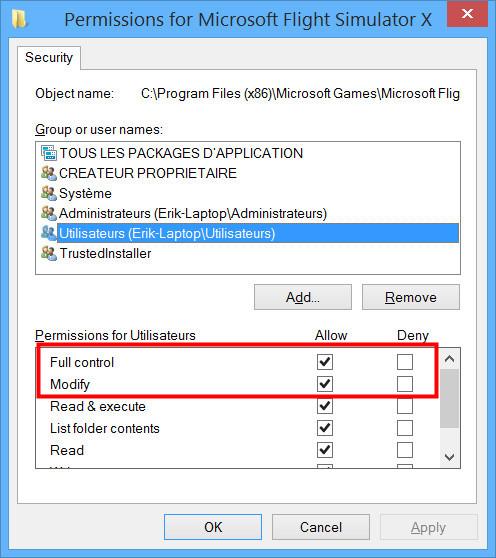
By default, FSX is installed in « C:\Program Files (x86)\Microsoft Games\Microsoft Flight Simulator X ». The problem is that on Windows 7 and 8+ or even Windows 10 you don’t have a full control of the files inside « Microsoft Flight Simulator X », which prevent a program from writing in a configuration file. To solve that problem, go to « C:\Program Files (x86)\Microsoft Games », then do a right click on the folder « Microsoft Flight Simulator X », click « Properties », then on the « Security » tab. Here, choose « Users (xxxxxx) », then click on « Modify ». In the window just opened, choose again « Users (xxxxxx) », click on « Full control », then « Modifications ». Now, you just have to click on « OK » and Windows will update the permissions.
Instructions in images below :
 |
 |
on
Sunday August 09
The gauge Boeing777-300.gau, originally created for FS2004, doesn’t works in FSX without a specific DLL
To solve this problem, you have to copy and paste the DLL « msvcr70.dll » in FSX’s main folder (C:\Program Files (x86)\Microsoft Games\Microsoft Flight Simulator X). If you have the same issue on Prepar3D, this solution should also work. Nevertheless, we have not tried it on P3D.
« msvcr70.dll » is available for free here : http://www.fichier-dll.fr/msvcr70.dll,2740,2740
on
Sunday August 09
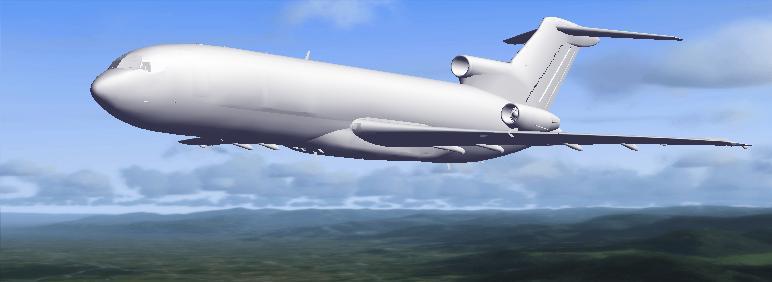
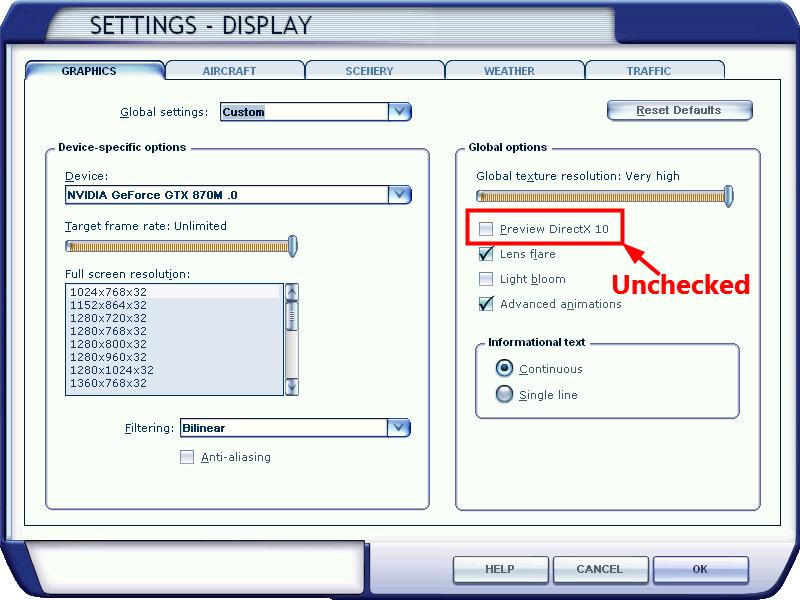
Something essential, when you own an add-on which 3D model was created for FS2004 but used in FSX SP2 (also called Port Over), is to deactivate the Preview DirectX 10 in the settings of FSX. In fact, FS2004 addons aren’t compatible with DirectX 10.
Example 1: A part of the airplane is invisible.
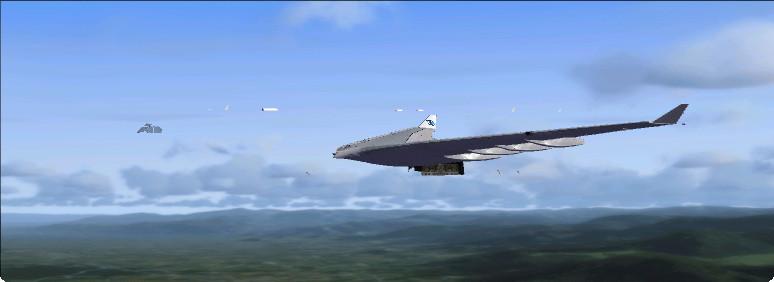
Example 2 : The wings if the airplane are invisible.
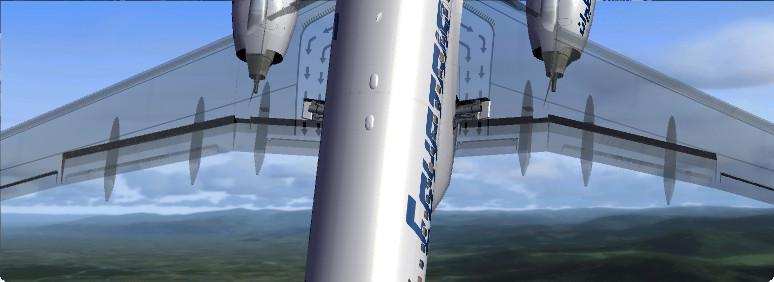
Example 3 : The airplane is entirely grey, without texture.
The solution : Deactivate DirectX 10 preview.
Example 1: A part of the airplane is invisible.

Example 2 : The wings if the airplane are invisible.

Example 3 : The airplane is entirely grey, without texture.

The solution : Deactivate DirectX 10 preview.

on
Sunday August 09
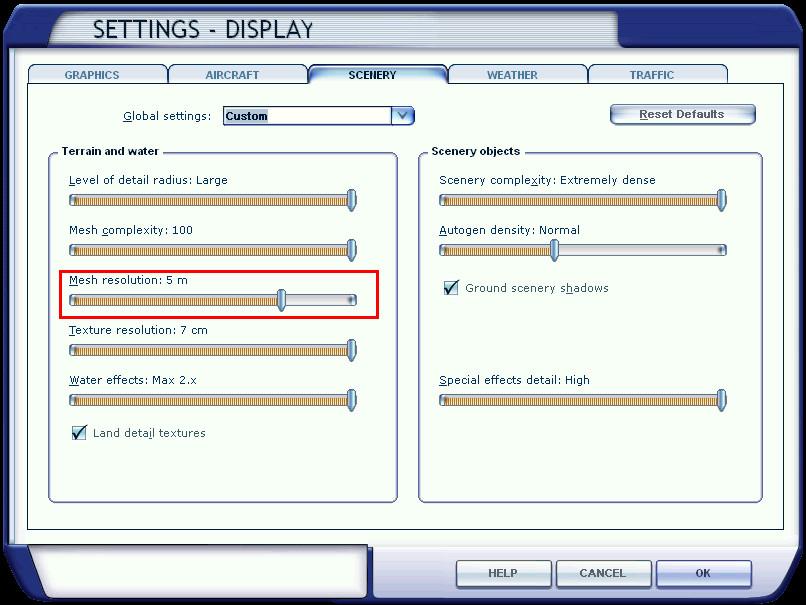
Some of your airplanes bounce on the tarmac, and the same thing happens for the vehicles around: that’s a known bug, which can be solved by modifying the « Mesh Resolution » to 5m maximum. In the Display Settings of FSX, click on the « Scenery » tab and change the resolution as shown below :

on
Sunday August 09
The issue is fixed in two easy steps :
Step 1 : Download UIAutomationCore.dll
Step 2 : Unpack the ZIP file and place the extracted UIAutomationCore.dll in the root of your FSX installation folder where the file fsx.exe resides. Make sure FSX is not running.
After this action, start FSX and you will find that switching views in FSX, no longer eventually causes FSX to crash.
Without this fix, FSX will hang as well as you will be “timed out” in a multi player session. Do not use any other versions of UIAutomationCore.dll, since this version is the only version that will stop the crashes.
on
Sunday August 09
To install FSX (all versions) on Windows 8/8.1, follow these steps :
1- Install FSX normally with the DVDs.
2- When the installation is over, right click on « fsx.exe » (you can find it here : C:\Program Files (x86)\Microsoft Games\Microsoft Flight Simulator X). Here, choose the « Compatibility » tab and set up the window as shown below :
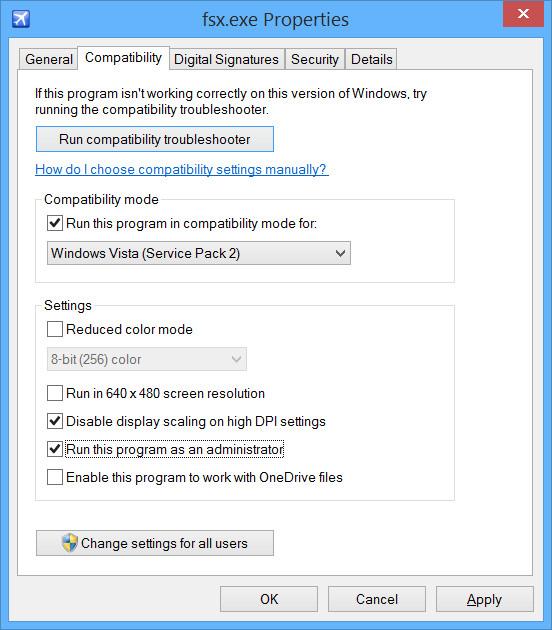
3- Download the 32 bits version of « UIAutomationCore », unzip the file and paste it in FSX’s main folder (C:\Program Files (x86)\Microsoft Games\Microsoft Flight Simulator X\). It will correct the problem of unexpected crashes of FSX.
Now, after these little steps, FSX should be stable on Windows 8/8.1 and 10
1- Install FSX normally with the DVDs.
2- When the installation is over, right click on « fsx.exe » (you can find it here : C:\Program Files (x86)\Microsoft Games\Microsoft Flight Simulator X). Here, choose the « Compatibility » tab and set up the window as shown below :

3- Download the 32 bits version of « UIAutomationCore », unzip the file and paste it in FSX’s main folder (C:\Program Files (x86)\Microsoft Games\Microsoft Flight Simulator X\). It will correct the problem of unexpected crashes of FSX.
Now, after these little steps, FSX should be stable on Windows 8/8.1 and 10
on
Sunday August 09
SP stands for Service Pack 1 or 2, which are patches improving FSX. They are available after the game’s release.
Flight Simulator X Service Pack 1 (Click to download) corrects the following issues found by clients after the game’s release :
• Activation and Installation
• Problems linked to the use of additional components
• Improvement of performance
• Problems linked to the content
Flight Simulator X Service Pack 2 (Click to download) improves the following functions :
• Multiplayer compatibility
• DirectX 10
You have to install the Service Pack 1 (SP1), before the second one.
on
Sunday August 09
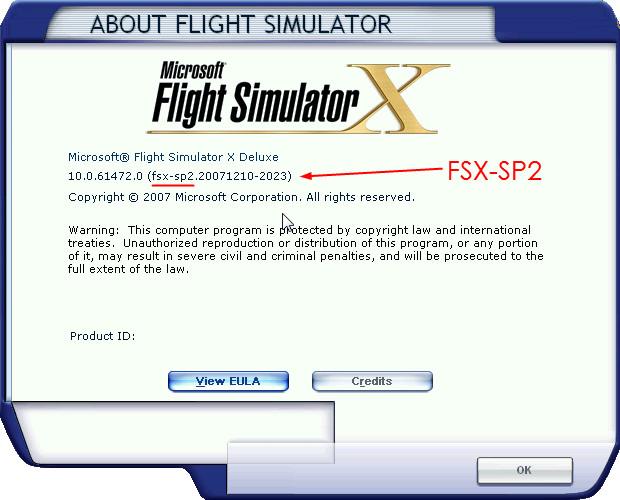
To know which version of FSX is installed on your computer, it’s easy: Start FSX, and begin a flight wherever you want, with any aircraft you want. Now, at the top of your screen, open the menu bar (if not already opened) and click on « Help » to the right. Here, click on « About ». The following window appears with your version of FSX:

on
Sunday August 09
All add-ons from Rikoooo can be uninstalled the same way :
This works on Windows Vista, 7, 8 and 10.
On the desktop, click on the « Start Menu », then on « All Programs » and go to the « Rikoooo Add-ons »
folder. When you click on it, you’ll find the list of add-ons you’ve installed on your computer. Now, you just
have to choose the one you want to uninstall.
Other method, from the Control Panel of Windows choose Programs and Features now you see the list of all your installed programs, select the one you want to uninstall.
on
Sunday August 09
From auto-installers version 10 or + all documentations are located in My Documents folder or Documents based on your Windows version.
Follow this steps from auto-installer lower than version 10 :
This works on Windows Vista, 7, 8 and 10.
On the desktop, click on the « Start Menu », then on « All Programs » and go to the « Rikoooo Add-ons » folder. When you click on it, you’ll find the list of add-ons you’ve installed on your computer.
Ohter method, you'll find all included documentation in the root folder of your add-ons, exemple : C:\Program Files (x86)\Microsoft Games\Microsoft Flight Simulator X\SimObjects\Airplanes\XXXX\
on
Sunday August 09
First, check that you have FSX-SP2 installed on your computer. Indeed, the « Preview DirectX 10 » only appears if you have installed the SP2 patch or if you have FSX Acceleration or FSX Gold or FSX Steam Edition.
Below you can download both patches
Download the SP1
Download the SP2
Below you can download both patches
Download the SP1
Download the SP2
on
Sunday August 09
When a lot of modifications have been made into the « Gauge » folder, it is frequent that a part of the base files are missing. In that case, if an add-on needs theses files, it won’t be able to display the gauges into the panel. Often solution consists in reinstalling FSX. In order to avoid reinstalling FSX, you can download Gauge Recover, which is a little program created by Rikoooo that will restore every original file from « Gauges » and « Effects » folders.
Update 13/02/2014 : A Prepar3d version is being created.
Update 13/02/2014 : A Prepar3d version is being created.
on
Sunday August 09
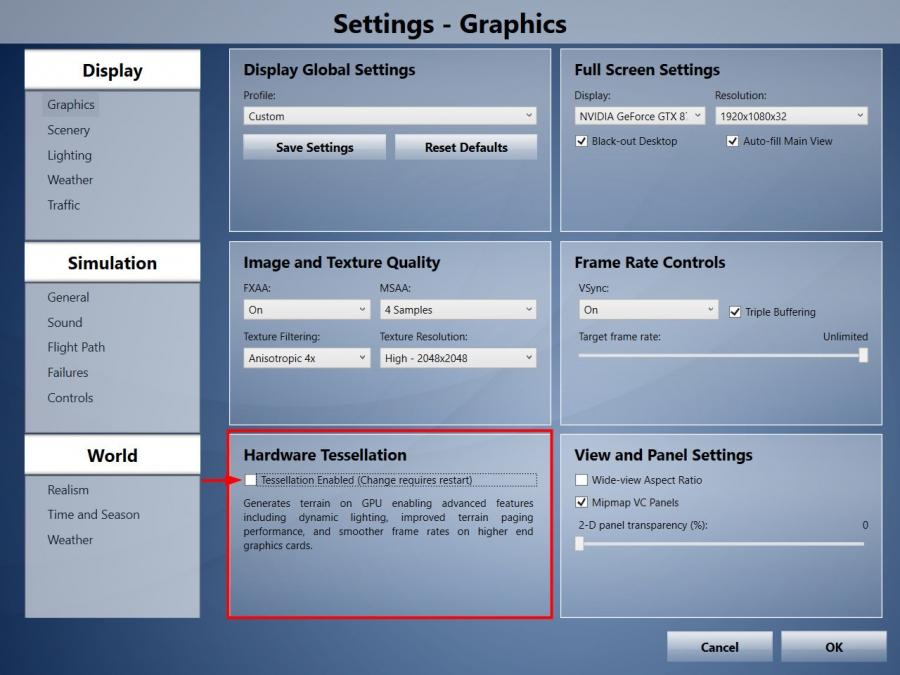
This problem is caused by the activation of the function Hardware Tessellation in the graphic configuration of Prepar3D v2 or v3.
Here is a comparison with scenery Seychelles Photo Real Scenery Pack avalaible here :
As shown in the above comparison, disabling the function Hardware Tessellation fix the problem.
After deactivation you must restart Prepar3D for the fix to take effect.
Here is a comparison with scenery Seychelles Photo Real Scenery Pack avalaible here :
With Hardware Tessellation enabled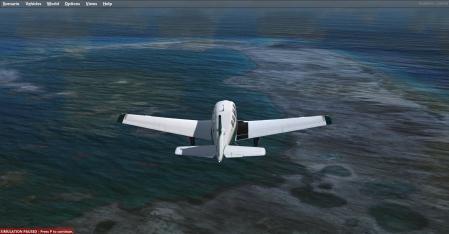 |
Without Hardware Tessellation enabled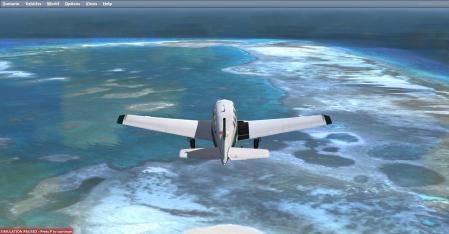 |
After deactivation you must restart Prepar3D for the fix to take effect.

on
Friday November 20
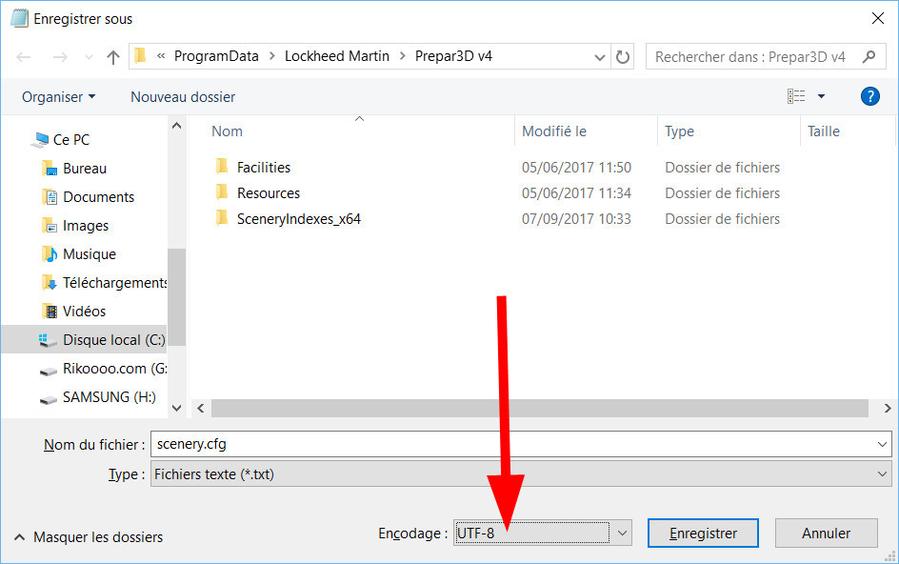
Users of new Prepar3D v4 : Following a charset change in Scenery.cfg to UTF-16LE the auto-installers can not anymore enable your scenery automatically.
Temporary solution : Open the folder C: \ ProgramData \ Lockheed Martin \ Prepar3D v4 then open the file Scenery.cfg with Notepad then click File - Save As ... In the window that opens select UTF-8 in the Encoding field (see image below) and click Save.
Re-install the scenery and voila.
This fix must be repeated for each scenery installation because P3D re-save the Scenery.cfg file in UTF-16LE after each opening.
Sceneries added after September 6, 2017 are not affected by this issue.
We are updating the automatic installer of each scenery, the problem will be corrected soon, but takes some time.

on
Thursday September 07
You wait but nothing happens, no file is downloaded, possibly after a few minutes of waiting you receive an error message of the type "Connection timeout" or "ERR_EMPTY_RESPONSE" or other messages according to your Internet browser.
In fact, the downloads from Rikoooo are sent from another local server on port 8888 (ex http://download.rikoooo.com:8888) this for a better stability of downloads especially with files of several Gigabytes.
The problem is that the firewall of the router (ex Livebox, Freebox, Neufbox) of certain users is configured to refuse the port 8888 (and also the port 8080), to know if you are in this case, go to Simviation.com and download any file at random, if the download does not start (like at Rikoooo), then you are among those small percentage of users whose router blocks port 8888 (and 8080 for Simviation). Those ports are normally used for the web interface, streaming, and HTTP, therefore, it's safe to open.
The solution
You must connect to your router (ex Livebox) and add a rule that opens the 8888 TCP / UDP port.
Here are links to some articles in English that explain how to open your ports, do not hesitate to do your own research on Google using the name of your Internet service provider as a keyword.
By WikiHow
https://www.wikihow.com/Open-Ports
By HowToGeek
https://www.howtogeek.com/66214/how-to-forward-ports-on-your-router/
Link to Youtube videos with dozens of tutorials (add your Internet service provider as a keyword)
https://www.youtube.com/results?search_query=open+your+router+port
on
Saturday March 03
Read this https://www.rikoooo.com/rikoooo-understanding-the-purpose-of-the-automatic-mod-installer-for-msfs
on
Wednesday December 14
Questions about my account
It is absolutely necessary to log on to your account to enjoy all our services and Jumbo speed. In order to do this, you’ll find a module at the top of your screen under the main menu on every page of the website. You can also login with your favorite social media such as Facebook.
Login with your username (or email address) and password that you have yourself chosen when you became a member.
Before login :

After a successful login :

Login with your username (or email address) and password that you have yourself chosen when you became a member.
Before login :

After a successful login :

on
Saturday August 08
If you have forgotten you password and/or your username, there are tools you can use to retrieve these informations :
I’ve forgotten my password
I’ve forgotten my username
If you still can’t access your account, contact us so that we can make the necessary modifications : Contact us.
I’ve forgotten my password
I’ve forgotten my username
If you still can’t access your account, contact us so that we can make the necessary modifications : Contact us.
on
Sunday August 09
- First, check that the statut « Jumbo OK » is placed in the top right side of the website like below :

If you see « - Statut : No Jumbo », that means your Jumbo subscription isn’t activated. Try to reconnect to your account, using the « Log out » button. It should activate your Jumbo subscription.
- If you see statut « Jumbo OK », but your download speed isn’t higher than 220ko/s, then check that your bandwidth isn’t slowed by other programs trying to download in the same time.
- After activation of your Jumbo please make sure to restart your downloads already in progress, Jumbo URLs will change.
- You should also check that your Internet connexion allows you to do high-speed downloads. It can be necessary to do a test with another computer and another Internet connexion to check that the problem does not come from your computer.
- In order to boost you download speed to the maximum, we advise you to download and install FlashGet, which is a free program allowing you to multiply your download speed up to 10 times. You can find it here : http://www.flashget.com
on
Sunday August 09
We bring a lot of changes and improvements, this is why it can sometimes happen that login function isn't working anymore. This is due to some changes on our server which isn't yet reflected on your side.
To resolve this, simply remove the cookies linked with your session on Rikoooo. You can do this automatically by following this link: https://www.rikoooo.com/fr/forum/user/delete_cookies You will be asked in French if you want to remove the cookies, click "Oui". You are done. Now you can try to login. Then click on this link https://www.rikoooo.com/board to get the website back to English.
If you still get an error message (more than twice) trying to login after the above solution, then you have probably forgotten your login information.
There are tools you can use to get back access to your account:
I’ve forgotten my password
I’ve forgotten my username
If you still can’t access your account, contact us so that we can make the necessary modifications: Contact us.
on
Thursday June 25

